TeamMate
From VoIP.ms Wiki
| [checked revision] | [checked revision] |
(→Phone System or comparable add-on Licenses) |
(→Phone System or comparable add-on Licenses) |
||
| Line 274: | Line 274: | ||
width:750px;"> | width:750px;"> | ||
| - | ''' | + | '''💬Good To Know:'''<br/> |
* Alternatively, you can leverage the "Call App" in Teams for your members. All you need is the Phone System Resources for each, and this license is free. | * Alternatively, you can leverage the "Call App" in Teams for your members. All you need is the Phone System Resources for each, and this license is free. | ||
Revision as of 14:44, 22 March 2024


What is TeamMate?
- The VoIP.ms Teams connector lets you link your VoIP.ms account (sub-account) to Microsoft Teams, so you can make and receive calls via your Microsoft Teams application.
- For each Microsoft Teams member, the PBX service lets you take advantage of VoIP.ms hosted features. Or with the Trunk service it gives you the ability to use Microsoft Teams' built-in PBX functionality and call routing.
- In other words, your Microsoft Teams becomes your softphone, giving you the option of using the built-in dial pad to make or receive calls, or even taking advantage of the Calls application, for those with limited licenses.
What are their different products?
-
PBX connector
- Client is using VoIP.ms PBX to decide the call routing strategy.
-
Trunk connector
- The customer can leverage Microsoft Teams PBX features such as auto-attendant, calling queues, call routing, etc.
-
Call App (Valet)
- Gives the ability to make and receive calls without the needs of E5 (or Phone System License).
- This only use Phone resources free license. Ideal for user that have minimal MS Licenses.
- This app provides Call Management Services for the Teams User.
- A complete suite of Call Control services are offered by this Service.
How to order a TeamMate subscription through VoIP.ms
Since we partnered with TeamMate you can get your connector subscription from us!
If you're interested in using VoIP.ms through MS Teams, simply send us an email to [email protected] mentioning you want to get this service and provide the following information:
- The service you're interested in (PBX connector, SIP trunk connector, Valet App).
- The number of licenses/seat you will need (users).
- The e-mail address of the user who has the "Microsoft Global Administrator" role.
Pricing
-
PBX connector:
- $4.50/user/month
-
Trunk connector:
- $3.50/user/month
-
CallApp/Valet connector:
- $6.00/user/month
Contact us at [email protected] for bulk pricing.
Prerequisites
Consider these prerequisites before requesting your TeamMate product subscription.
Microsoft Minimal Requirements
- Microsoft licenses:
- - See the licensing section of this article.
- Number of users to set up.
- Microsoft Global Administrator
- - The initial sign-in and activation must be done by clicking on the button in the email that will be sent to the Microsoft Global Admin for the Enterprise you will connect.
- - The Microsoft Global Administrator must be the one to register the enterprise, grant permissions, and finalize changes for the end users.
- For PBX Connector
- - Proper license by User + Phone System Standard or Add-On (See licensing section).
- For Trunk Connector
- - Proper license by User + Phone System Standard or Add-On (See licensing section).
- CallApp / Valet
- - Phone resources license for each user that will use the CallApp.
VoIP.ms Technical Requirements
- For PBX Connector
- - Dialing mode of the VoIP.ms account must be set to E.164.
- - One sub-account per user with the following specs:
- Authentication: Username/Password.
- Device type: ATA device IP Phone or Softphone.
- Caller ID: A DID as the caller ID or a verified Caller ID.
- Codecs: G722.
- For Trunk Connector
- - Dialing mode of the VoIP.ms account must be set to E.164.
- - One sub-account per user with the following specs:
- Authentication: Username/Password.
- Device type: Asterisk, IP PBX, Gateway or VoIP Switch.
- Caller ID: I use a system capable of passing its own CallerID.
- Codecs: G722.
- For CallApp / Valet
- - Requires PBX or Trunk Connector..
- - If using the PBX Connector. The user must have one sub-account per user with the following specs. (Trunk connector will handle the user).:
- Authentication: Username/Password.
- Device type: ATA device IP Phone or Softphone.
- Caller ID: A DID as the caller ID or a verified Caller ID.
- Codecs: G722.
Licensing - MS Licensing for the PBX and SIP Trunk Connector
These are the licenses and combinations that allow the use of Microsoft Direct Routing. The Phone System add-on license is required per user to enable the native dial-pad in Teams.
💬 NOTE
- Note that other licenses may work: Teammate' system will dynamically evaluate license contents when an Enterprise commences Direct Routing setup and adds suitable licenses to the lists when new Microsoft licenses are encountered.
💬 NOTE
- ➜ When purchasing phone add-on licenses we recommend purchasing ones that do NOT include the Microsoft Calling Plan. ConnecttoTeams replaces the need for this additional cost. Additionally, the Calling Plan can interfere with the provisioning process and cause delays. As of June 2022 Microsoft is in the process of retiring the "Business Voice" licenses. The most appropriate replacement for this license is "Microsoft Teams Phone Standard." Microsoft's documentation is aggressively promoting the (more expensive) license with Calling Plan. Do not accept the upselling attempts.

💬 NOTE
- ➜ Additionally, as Microsoft retires the older Business Voice and Phone System licenses existing customers will be forced to migrate to the newer ones.
After the licenses are updated this may disable calling for the user. If this occurs the solution is for the global administrator to disable and re-enable each user in the ConnecttoTeams Portal. Allow propagation time between the disable and the re-enable.

Inclusive Licenses (User license + Phone System add-on)
| product_name | sku | guid |
|---|---|---|
| Microsoft Teams Shared Devices (previously "Common Area Phone") | MCOCAP | 295a8eb0-f78d-45c7-8b5b-1eed5ed02dff |
| M365 G5 Gcc | M365_G5_GCC | e2be619b-b125-455f-8660-fb503e431a5d |
| Meeting Room GOV | MEETING_ROOM_GOV | 9571e9ac-2741-4b63-95fd-a79696f0d0ac |
| Microsoft 365 A5 for faculty | M365EDU_A5_FACULTY | e97c048c-37a4-45fb-ab50-922fbf07a370 |
| Microsoft 365 A5 for students | M365EDU_A5_STUDENT | 46c119d4-0379-4a9d-85e4-97c66d3f909e |
| Microsoft 365 E5 | SPE_E5 | 06ebc4ee-1bb5-47dd-8120-11324bc54e06 |
| Microsoft 365 E5 without Audio Conferencing | SPE_E5_NOPSTNCONF | cd2925a3-5076-4233-8931-638a8c94f773 |
| Microsoft 365 GOV G5 | M365_G5_GOV | b0f809d5-a662-4391-a5aa-136e9c565b9d |
| Office 365 A5 for faculty | ENTERPRISEPREMIUM_FACULTY | a4585165-0533-458a-97e3-c400570268c4 |
| Office 365 A5 for students | ENTERPRISEPREMIUM_STUDENT | ee656612-49fa-43e5-b67e-cb1fdf7699df |
| OFFICE 365 ENTERPRISE DEVELOPER E5 | DEVELOPERPACK_E5 | c42b9cae-ea4f-4ab7-9717-81576235ccac |
| OFFICE 365 ENTERPRISE E5 | ENTERPRISEPREMIUM | c7df2760-2c81-4ef7-b578-5b5392b571df |
| OFFICE 365 ENTERPRISE E5 WITHOUT AUDIO CONFERENCING | ENTERPRISEPREMIUM_NOPSTNCONF | 26d45bd9-adf1-46cd-a9e1-51e9a5524128 |
| OFFICE 365 GCC G5 | ENTERPRISEPREMIUM_GOV | 8900a2c0-edba-4079-bdf3-b276e293b6a8 |
Non-Inclusive Licenses (User license only.) Requires Phone System add-on.
| product_name | sku | guid |
|---|---|---|
| Enterprisepackplus Student | ENTERPRISEPACKPLUS_STUDENT | 98b6e773-24d4-4c0d-a968-6e787a1f8204 |
| Enterprisewithscal Student | ENTERPRISEWITHSCAL_STUDENT | 05e8cabf-68b5-480f-a930-2143d472d959 |
| M365 F1 COMM | M365_F1_COMM | 50f60901-3181-4b75-8a2c-4c8e4c1d5a72 |
| M365edu A3 Stuusebnft | M365EDU_A3_STUUSEBNFT | 18250162-5d87-4436-a834-d795c15c80f3 |
| M365edu A5 Stuusebnft | M365EDU_A5_STUUSEBNFT | 31d57bc7-3a05-4867-ab53-97a17835a411 |
| Microsoft 365 A3 for faculty | M365EDU_A3_FACULTY | 4b590615-0888-425a-a965-b3bf7789848d |
| Microsoft 365 A3 for students | M365EDU_A3_STUDENT | 7cfd9a2b-e110-4c39-bf20-c6a3f36a3121 |
| Microsoft 365 BUSINESS | SPB | cbdc14ab-d96c-4c30-b9f4-6ada7cdc1d46 |
| Microsoft 365 E3 | SPE_E3 | 05e9a617-0261-4cee-bb44-138d3ef5d965 |
| Microsoft 365 F1 | M365_F1 | 44575883-256e-4a79-9da4-ebe9acabe2b2 |
| Microsoft 365 F3 | SPE_F1 | 66b55226-6b4f-492c-910c-a3b7a3c9d993 |
| Microsoft 365 GOV G3 | M365_G3_GOV | e823ca47-49c4-46b3-b38d-ca11d5abe3d2 |
| MICROSOFT TEAMS EXPLORATORY | TEAMS_EXPLORATORY | 710779e8-3d4a-4c88-adb9-386c958d1fdf |
| Mtr Prem | MTR_PREM | 4fb214cb-a430-4a91-9c91-4976763aa78f |
| Office 365 A1 for faculty | STANDARDWOFFPACK_FACULTY | 94763226-9b3c-4e75-a931-5c89701abe66 |
| Office 365 A3 for faculty | ENTERPRISEPACKPLUS_FACULTY | e578b273-6db4-4691-bba0-8d691f4da603 |
| Office 365 BUSINESS ESSENTIALS | O365_BUSINESS_ESSENTIALS | 3b555118-da6a-4418-894f-7df1e2096870 |
| Office 365 BUSINESS PREMIUM | O365_BUSINESS_PREMIUM | f245ecc8-75af-4f8e-b61f-27d8114de5f3 |
| Office 365 ENTERPRISE E1 | STANDARDPACK | 18181a46-0d4e-45cd-891e-60aabd171b4e |
| Office 365 ENTERPRISE E2 | STANDARDWOFFPACK | 6634e0ce-1a9f-428c-a498-f84ec7b8aa2e |
| Office 365 ENTERPRISE E3 | ENTERPRISEPACK | 6fd2c87f-b296-42f0-b197-1e91e994b900 |
| Office 365 ENTERPRISE E3 DEVELOPER | DEVELOPERPACK | 189a915c-fe4f-4ffa-bde4-85b9628d07a0 |
| Office 365 ENTERPRISE E4 | ENTERPRISEWITHSCAL | 1392051d-0cb9-4b7a-88d5-621fee5e8711 |
| Office 365 F1 | DESKLESSPACK | 4b585984-651b-448a-9e53-3b10f069cf7f |
| Office 365 GCC G3 | ENTERPRISEPACK_GOV | 535a3a29-c5f0-42fe-8215-d3b9e1f38c4a |
| Office 365 SMALL BUSINESS ESSENTIALS | SMB_BUSINESS_ESSENTIALS | dab7782a-93b1-4074-8bb1-0e61318bea0b |
| Office 365 SMALL BUSINESS PREMIUM | SMB_BUSINESS_PREMIUM | ac5cef5d-921b-4f97-9ef3-c99076e5470f |
| Spe E3 Rpa1 | SPE_E3_RPA1 | c2ac2ee4-9bb1-47e4-8541-d689c7e83371 |
| Standardpack Gov | STANDARDPACK_GOV | 3f4babde-90ec-47c6-995d-d223749065d1 |
| Standardwoffpack Iw Faculty | STANDARDWOFFPACK_IW_FACULTY | 78e66a63-337a-4a9a-8959-41c6654dfb56 |
| Standardwoffpack Iw Student | STANDARDWOFFPACK_IW_STUDENT | e82ae690-a2d5-4d76-8d30-7c6e01e6022e |
| Standardwoffpack Student | STANDARDWOFFPACK_STUDENT | 314c4481-f395-4525-be8b-2ec4bb1e9d91 |
Phone System or comparable add-on Licenses
💬Good To Know:
- Alternatively, you can leverage the "Call App" in Teams for your members. All you need is the Phone System Resources for each, and this license is free.
| product_name | sku | guid |
|---|---|---|
| Mcocap Faculty | MCOCAP_FACULTY | 420c7602-7f70-4895-9394-d3d679ea36fb |
| Mcocap Gov | MCOCAP_GOV | b1511558-69bd-4e1b-8270-59ca96dba0f3 |
| Meeting Room | MEETING_ROOM | 6070a4c8-34c6-4937-8dfb-39bbc6397a60 |
| Meeting Room Faculty | MEETING_ROOM_FACULTY | 132b5ce3-eb0b-4d49-91fa-2932ffe4971c |
| Meeting Room Noaudioconf | MEETING_ROOM_NOAUDIOCONF | 61bec411-e46a-4dab-8f46-8b58ec845ffe |
| MICROSOFT 365 PHONE SYSTEM FOR GCC | MCOEV_GOV | a460366a-ade7-4791-b581-9fbff1bdaa85 |
| MICROSOFT 365 PHONE SYSTEM FOR STUDENTS | MCOEV_STUDENT | 1f338bbc-767e-4a1e-a2d4-b73207cc5b93 |
| MICROSOFT 365 PHONE SYSTEM FOR TELSTRA | MCOEV_TELSTRA | ffaf2d68-1c95-4eb3-9ddd-59b81fba0f61 |
| MICROSOFT 365 PHONE SYSTEM_USGOV_DOD | MCOEV_USGOV_DOD | b0e7de67-e503-4934-b729-53d595ba5cd1 |
| MICROSOFT 365 PHONE SYSTEM_USGOV_GCCHIGH | MCOEV_USGOV_GCCHIGH | 985fcb26-7b94-475b-b512-89356697be71 |
| Microsoft Business Voice | BUSINESS_VOICE | e5a17adf-8f0d-4b57-bc14-d331235f9307 |
| Microsoft Business Voice Medium Telco | BUSINESS_VOICE_MED2_TELCO | 08d7bce8-6e16-490e-89db-1d508e5e9609 |
| Microsoft Business Voice Medium Without Calling Plan | BUSINESS_VOICE_DIRECTROUTING_MED | 8330dae3-d349-44f7-9cad-1b23c64baabe |
| Microsoft Business Voice Medium2 | BUSINESS_VOICE_MED2 | a6051f20-9cbc-47d2-930d-419183bf6cf1 |
| Microsoft Business Voice Without Calling Plan | BUSINESS_VOICE_DIRECTROUTING | d52db95a-5ecb-46b6-beb0-190ab5cda4a8 |
| Microsoft Phone System for faculty | MCOEV_FACULTY | d979703c-028d-4de5-acbf-7955566b69b9 |
| Mtr Prem Us Can | MTR_PREM_US_CAN | 03070f91-cc77-4c2e-b269-4a214b3698ab |
| PHONE SYSTEM Teams Phone Standard | MCOEV | e43b5b99-8dfb-405f-9987-dc307f34bcbd |
| Teams Phone with Calling Plan | MCOTEAMS_ESSENTIALS * This includes the Domestic Calling Plan. Ensure that this is removed from the Microsoft Admin Center to prevent provisioning delays. | ae2343d1-0999-43f6-ae18-d816516f6e78 |
TeamMate configuration
Please follow the instructions that you will find in this section to set up the TeamMate product you subscribed for.
Please note this process requires the complete involvement of the Microsoft Global Administrator. Some tasks can be delegated from the global admin to the “Microsoft Teams Service Admin” & “Skype Admin,” but due to Microsoft's security policies there is no way to complete setup without the Global Administrator initial involvement.
PBX Connector Installation
-
[1] Assign MS licenses to each planned user of ConnecttoTeams.
- Before beginning with ConnecttoTeams, each planned MS Teams User must have the correct licenses assigned to them.
- Sometimes due to high traffic Microsoft can take up to 24 hours to activate licenses after they have been assigned, so doing this ahead of time will make the rest of the process much more streamlined.
- Also, ensure there is one additional set of licenses available and unassigned.
- Don’t worry, you can recover these extra licenses once the setup is done.
- If there is a canceled/suspended trial license and a valid license is added with the same name - you should make sure that the canceled trial subscription is removed from the license listing. If not, Microsoft only returns the canceled/suspended SKU and the software will erroneously claim that the proper licenses are not available.
-
[2] Grant permissions.
- Once your TeamMate subscription is active, you will receive an email to start the configuration process.
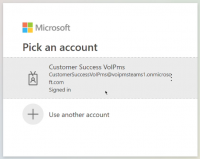
- The global administrator must click the link provided in the email they receive,
-

- Then log into the Enterprise portal with your Global Administrator credentials, and authorize the requested permissions.
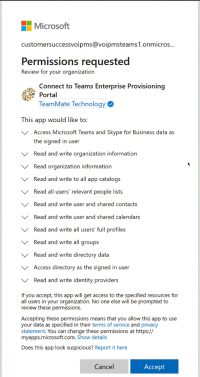
- There are two permission screens that are mandatory and will need to be granted before the enterprise can log into the connector.
- 1)
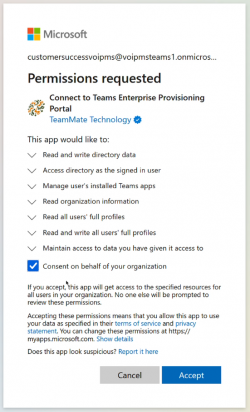 2)
2)  3)
3) 
- 4) 5)
- 1)


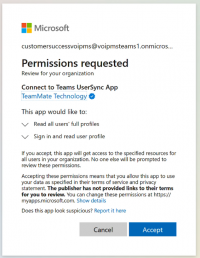
- Once logged in there are prompts to sync a group of users then on the dashboard to grant optional additional permissions that enhance ConnecttoTeams call troubleshooting and presence syncing.
- 1)

- 2)

- Must do this for each.
- 3)

- 4)

- 1)


-
[3] Confirm Microsoft licensing.
- Upon logging in as the Global Administrator, use the sidebar menu to navigate to Direct Routing Management >> Direct Routing.
- Confirm there is one available Microsoft license free to be assigned.
- 1)

- What if the portal says there are negative licenses available?
- What if the portal says I don’t have any available licenses when I know that I do?
- 1)

-
[4] Configure Direct Routing.
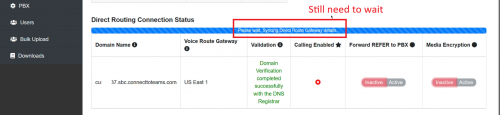
- [1] Click on the “Direct Routing” tab.
- [2] Select the desired Gateway then Click “Complete Direct Routing,” ensure the verification process succeeds, and then click "Complete."
- 1)

- 2)

- Wait until the process is done.
- 3)

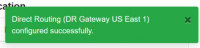
- Continue to wait until the green popup and the email confirmation.
- 4)
- 1)


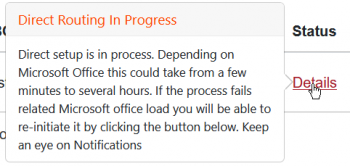
- [3] Wait for the notification on the dashboard that lets you know the set-up is complete.
- If the process takes longer than an hour open a ticket with ConnecttoTeams so we can unfreeze the process, as this indicates Microsoft's servers were under heavy traffic and timed out. The global administrator will receive an email when it is complete.
- [3] Wait for the notification on the dashboard that lets you know the set-up is complete.
- Once completed, the green popup will appear in the corner.
- 5)
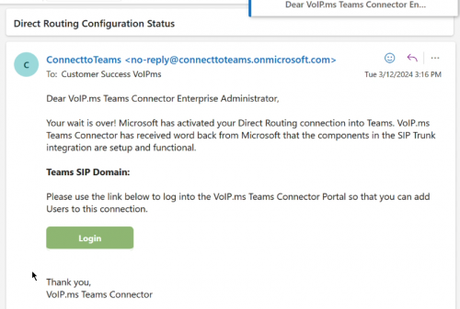
- And an email will be received confirming the Direct Routing configuration.
- 6)

- Note that when everything looks completed, it may still have a delay. It is possible to click "FINISH"
-

-


- [4] Decide if allowing SIP REFER or Media Encryption is desired for the Direct Route.
- Benefits of enabling REFER:
- - Call park and Transferring will work as is typical.
- 350px
- Benefits of enabling REFER:
- [4] Decide if allowing SIP REFER or Media Encryption is desired for the Direct Route.
- If desired it is possible to configure additional Direct Routes. Decide if the enterprise wants to opt into Microsoft's secondary routes for redundancy.
- What if I have already set up Direct Routing in Teams before and it is blocking the new configuration process?
- What if I previously used the Microsoft Calling Plan and it is blocking the new configuration?
- What if the Direct Routing user is created but the Direct Routing fails to be established?
- Why is the domain I chose not working?
-
[5] Configure PBX settings
- [1] Navigate to the “PBX Settings” tab.
- [2] Input the VoIP.ms parameters required for the PBX connector.
- This task can be delegated to someone other than the Microsoft Global Administrator.
- Necessary PBX information includes:
- PBX SIP Domain (required): VoIP.ms POP Server Hostname
- PBX SIP Domain Proxy: VoIP.ms POP Server Hostname
- Voicemail Feature Code: *97
- PBX SIP Domain Procy Port: 5060
- Codecs: G722 Only (Be sure the sub-account is set with this codec)
- Reg Expires: 600
- Caller ID on Forwarding: User's Caller ID
- Caller Name Policy: Other
- Custom Caller Name: See the requirements below.
IMPORTANT - Custom Caller Name
- Entering outbound Caller ID Name, it must be in CAPITAL LETTERS. This will appear more clearly/visible on some devices.
- You must NOT use any special characters. They will not be displayed and it prevents potential outbound call issues.
- Do NOT exceed 15 characters. Traditional Canadian providers will not show more than 15 characters. We suggest shrinking or adapting the name.
- Spaces are allowed in a caller ID name but count as characters. (do not exceed 15 chars. in total).

-
[6] Add Users
- This can be done individually or in bulk. You will need the information about each user's PBX/SIP profile available for configuration.
- This task takes some time to process, please wait for a confirmation email telling you it is completed.
- NOTE: This task can be delegated to someone other than the Microsoft Global Administrator, but the Global Admin will have to log in to sync the users once they are uploaded.
- Necessary PBX SIP user credentials include:
- SIP User: The sub-account username.
- SIP Authentication ID: The sub-account username.
- SIP Password: The sub-account username.
- Phone Number or Extension Number: If using PBX, the user could enter the internal extension number. Or, the Phone number if they have dedicated phone number per user.
- If you are a reseller, you can add users for your enterprise customers, but we will need to finalize the process for you to perform a sync to complete Teams registration and calling.
- What does disabling voicemail for a user do?
- What if the user does not have a direct phone number, but only has an extension?.
- What if the dialpad doesn’t appear?
- Confirm the user has been properly assigned to the voice routing policy.
-
[7] Build and deploy the custom Teams Application.
- This will enable advanced PBX features such as SIP softkeys, notifications, presence syncing, and portals within Teams.
- Ensure you have custom apps enabled for Teams
- If you want to use presence syncing ensure you have granted that permission before building the app
- Delete an existing app from Teams
SIP Trunk Configuration
This article is a step-by-step guide to the initial provisioning of the ConnecttoTeams SIP Trunk. Start here, and follow links as needed for additional details and troubleshooting.
-
[1]: Assign Microsoft licenses to each planned user of ConnecttoTeams. Before beginning with ConnecttoTeams.
- Each planned Microsoft Teams User must have the correct licenses assigned to them. Sometimes due to high traffic Microsoft can take up to 24 hours to activate licenses after they have been assigned, so doing this ahead of time will make the rest of the process much more streamlined. Also ensure there is one additional set of licenses available and unassigned. Don’t worry, you can recover these extra licenses once setup is done.
- If there is a canceled/suspended trial license and a valid license is added with the same name - you should make sure that the canceled trial subscription is removed from their license listing. If not, Microsoft only returns the canceled/suspended SKU and the software will erroneously claim that the proper licenses are not available.
-
[2]: Grant permissions.
- Once your TeamMate subscription is active, you will receive an email to start the configuration process.
- The global administrator must click the link provided in the email that will receive, log into the Enterprise portal with their Global Administrator credentials, and authorize the requested permissions. There are two permission screens that are mandatory and will need to be granted before the enterprise can log into the connector. Once logged in there are prompts on the dashboard to grant optional additional permissions that enhance ConnecttoTeams' call troubleshooting and presence syncing.
-
[3]: Confirm Microsoft licensing.
- Upon logging in as the Global Administrator, use the sidebar menu to navigate to Direct Routing Management>> Direct Routing. Confirm there is one available Microsoft license free to be assigned.
- What if the portal says there are negative licenses available?
- What if the portal says I don’t have any available licenses when I know that I do?
- Upon logging in as the Global Administrator, use the sidebar menu to navigate to Direct Routing Management>> Direct Routing. Confirm there is one available Microsoft license free to be assigned.
-
[4]: Configure Direct Routing.
- Click the “Direct Routing” tab. Select the desired Gateway then click “Complete Direct Routing,” ensure the verification process succeeds, and click "Complete.". Wait for the notification on the dashboard that lets you know set-up is complete. If the process takes longer than an hour open a ticket with ConnecttoTeams so we can unfreeze the process, as this indicates Microsoft's servers were under heavy traffic and timed out. The global administrator will receive an email when it is complete.
- Decide if allowing SIP REFER or Media Encryption is desired for the Direct Route. If desired it is possible to configure additional Direct Routes. Decide if the enterprise wants to opt into Microsoft's secondary routes for redundancy.
- What if I have already set up Direct Routing in Teams before and it is blocking the new configuration process?
- What if I previously used the Microsoft Calling Plan and it is blocking the new configuration?
- What if the Direct Routing user is created but the Direct Routing fails to be established?
- Why is the domain I chose not working?
-
[5]: Add Trunk Profile.
- After the enterprise has configured Direct Routing, responsibility switches back to the reseller. They will need to set up the trunk profile with information from the customer's telecom account.
-
[6]: Manage Trunk.
- Once the trunk is created you will need to add DIDs and choose a default. Note: The Trunk DID page has been retired and replaced by the Phone Numbers page.
- Please see the Upload and Assign Phone Number section in this KB for reference - https://docs.connecttoteams.com/en/articles/200-centralized-did-management
-
[7]: Configure Trunk Settings For Users.
- (Individual or in Bulk). Enable trunk(s) for each user, choose a default trunk, and assign DIDs.
Other Useful Articles
- Youtube - TeamMate PBX Connector - How it Works
- Azure Marketplace: TeamMate PBX Connector (Overview, Plans + Pricing, Details + Support)
- Microsoft Appsource: TeamMate PBX Connector (Overview, Plans + Pricing, Details + Support)