Migrating from VoIPo to VoIP.ms
From VoIP.ms Wiki
| [checked revision] | [quality revision] |
(→Numbers portable) |
(→International Port IN Fees) |
||
| Line 123: | Line 123: | ||
For more information about prices you can contact [http://voip.ms/ VoIP.ms] staff, since the rate can vary depending on the country your number belongs to. | For more information about prices you can contact [http://voip.ms/ VoIP.ms] staff, since the rate can vary depending on the country your number belongs to. | ||
| - | |||
| - | |||
| - | |||
| - | |||
| - | |||
| - | |||
=== Check Availability === | === Check Availability === | ||
Latest revision as of 16:49, 21 August 2025
Lexicon
| VoIPo | VoIP.ms |
|---|---|
| Conference | Audio Conferencing |
| Directory | Phone Book |
| Group | Ring Group |
| SIP (Extensions) | Sub-Account |
| Schedule | Time Condition |
| IVR | Digital Receptionist (IVR) |
🛫 Migration of your service to VoIP.ms
- If you're moving your phone service from VoIPo to VoIP.ms, this section will guide you through every step of the process. From porting your numbers to recreating your voicemail, call routing, and IVR settings — we’ll help you make the transition smooth, fast, and fully functional. No data is transferred automatically, but with this guide, you can quickly rebuild your setup using VoIP.ms tools and features.
- Let’s get started with your migration!
📱 Device Setup and Configuration
- We offer a variety of configuration guides to help you get started with your existing or new VoIP device. Whether you wish to continue using your current device or plan to purchase a new one, the resources below can guide you through the setup process.
- If your specific device is not listed, feel free to reach out via live chat or by emailing us at [email protected] for personalized assistance.
Need a New Device?
- You can easily acquire a new VoIP device through https://www.voipsupply.com — be sure to use the referral code VOIPMS at checkout.
Configuration Guides
- Potential Devices You May Already Be Using
- Please note that you will need to factory reset your device to then be able to configure it with VoIP.ms.
- Note we've received comments on having devices on a DMZ port. Please make sure to connect your device to a regulart port.
Otherwise, you can view all our configuration guides here:
- Softphones: https://wiki.voip.ms/article/Softphones
- ATA Devices: https://wiki.voip.ms/article/ATA_Devices
- IP Phones: https://wiki.voip.ms/article/IP_Phones
- PBX Systems: https://wiki.voip.ms/article/PBXs
- Session Border Controllers (SBCs): https://wiki.voip.ms/article/Session_Border_Controllers
Account Credentials
- Your username is the 6-digit number displayed on your VoIP.ms main account page.
- Your password is the same one you use to sign in to your VoIP.ms account.
Server Registration
- For the full list of available servers to register your device with, please visit: https://wiki.voip.ms/article/Servers
🔌Configuring Multiple Devices with VoIP.ms Using Sub Accounts
- If you need to register more than one device with VoIP.ms, you must create separate Sub Accounts (also referred to as SIP accounts in VoIPo). Sub Accounts allow each device to register independently using unique credentials.
How to Create a Sub Account
- 1. Log in to your VoIP.ms portal.
- 2. Navigate to Sub Account > Create Sub Account.
- 3. Fill in the required fields:
- a. Username: This will follow the format:
- b. YourMainAccountNumber_SubAccountName (e.g., 123456_officephone)
- c. Password: Create a secure password that your device will use to register with this sub account.
- d. Caller ID Number: Enter the Caller ID associated with your DID (phone number).
- e. If your number hasn’t ported yet, you can verify your Caller ID by clicking “Click here to get started” in the Caller ID section.
- f. Internal Extension Number: Assign an internal extension for this sub account to enable internal calling between extensions.
- 4. Click Create Account.
- 5. Repeat this process for each additional device you want to register with VoIP.ms.
Need to Register Multiple Devices?
- Create as many sub accounts as needed—each device must use a unique sub account for proper registration and independent operation.
🔁 How to Port Your VoIPo Number(s) to VoIP.ms
- Porting your number from VoIPo to VoIP.ms is a simple process. Follow the steps below to obtain the required documentation and begin your port request.
Port a number
Porting a number is the process of transfer a number from one provider to another. If you are a VoIP.ms customer and have an existing number with a different provider you can optionally bring it (port it in) to VoIP.ms network. Toll free numbers, local USA/Canada and even International numbers can be ported to VoIP.ms. As of January 15th, 2020, all portings are free of charge across Canada and US48.
Our LNP (Local Number Portability) Department handles the porting process and guides the customer through it. They are also in charge of updating the customer via email with any relevant information about the port every time there is a change of the port request status. (Such as when the information has been submitted to the carrier, when a porting date -known as FOC- has been received, when the port has completed, etc)
To port your number over, please verify with your existing service provider that the address listed in your Customer Service Record (CSR)/Account information/Customer portal is a physical address. PO BOX addresses are not valid for portability.
Note: For Wireless Ports in Canada, some Carriers may send either an SMS or email to the owner regarding the approval for the current port request. Once you receive this notice, you have 90 minutes to reply and approve the port, otherwise, the losing carrier may reject the port request and cancel the process.
Numbers portable
We can port numbers from most countries all over the world, even if we do not offer DID numbers from those countries. If you wish to verify the portability of an International number please contact our LNP staff and provide the Country code, Area code and phone number, it is important to also mention if the number is a National, Geographical or Toll-Free number. You may email us at [email protected] For Faxes, we can port from Canada, United States local numbers as well as toll free numbers. The porting fee per number is $15 USD.
For more information about prices you can contact VoIP.ms staff, since the rate can vary depending on the country your number belongs to.
Check Availability
Not all numbers from a specific country can be ported in. The most important factor to find out if a number is portable or not is the number´s city (also called ratecenter). In your customer portal, refer to DID Numbers section, you will find a link for DID Portability. In this link you can verify if your number is portable to our network, just click on the link that says "Check availability".

Important: For Canadian, US and Toll-free Numbers the porting fee is free per number in order to port to our network, the process can takes around 5 working days before everything is completed.
Start Procedure
Once you have verified your number can be ported, on the same link (DID Portability) click on "Start procedure" you will be presented with a process of 5 steps to initiate the port of your number.

- Important: Make sure you have a scan of your latest invoice/statement in PDF, MS Word or as an Image file, SIGNED on a blank part.
- Do not sign it over any lines or graphics.
After following all the steps in the process and confirmed your order, you will receive an email notification from our LNP Department, that will guide you during the entire process and provide all the necessary updates. If any additional information is required they will contact you, so you can be informed all the time.
Here you can find a detailed explanation of each step you have to follow in order to start a port request:
Notification on Portal
Once you have placed a porting order, you will notice a notification next to DID Numbers Menu and DID Portability. This is to help you remember an ongoing port is happening and to pay attention for any updates coming from VoIP.ms LNP team.

Port Rejection
If there is a problem with your porting process, the LNP department will notify you via email on the following steps to take to address this problem. You can read more about port rejections and the most common reasons here, Port Rejection.
📥 How to Save Your VoIPo Voicemail Messages (Residential & Business Accounts)
- To download and preserve your existing voicemail messages from VoIPo, follow these steps:
- 1. Log in to your VoIPo Portal.
- 2. Click on Features (or Menu, depending on your interface).
- 3. Navigate to Voicemail under the Features section.
- 4. Locate the voicemail message you want to save.
- 5. Click the three dots (⋮) next to the voicemail player.
- 6. Select Download to save the message as an audio file to your device.

- 7.💡 Repeat this process for each voicemail you wish to keep.
📄 How to Export Your Call History (CDR) from VoIPo
- To download your Call Detail Records (CDR) from your VoIPo account:
- 1. Log in to your VoIPo account.
- 2. Click on Features, then select Call History.
- 3. Choose the desired month and year from the dropdown.
- 4. Click Download All History to export your call records as a file.

🔧 Configuring the Same Features with VoIPo, with VoIP.ms
- If you're transitioning from VoIPo to VoIP.ms, you'll be glad to know that many of the features you used with VoIPo are also available with VoIP.ms — often with even greater flexibility. This section explains how to replicate common VoIPo features using the VoIP.ms platform.
- Below is a quick guide to help you configure key features in VoIP.ms that match what you may be used to from VoIPo:
🎙️ How to Upload Your Recordings to VoIP.ms
- If you're migrating from VoIPo or simply need to add custom audio messages (e.g., IVR prompts, voicemail greetings, announcements), you can easily upload recordings to VoIP.ms.
- 1. Log in to your VoIP.ms portal.
- 2. Navigate to DID Numbers > Recordings.

- 3. Click Upload New Recording.
- 4. Fill in the upload form:
- a. Name: Assign a name to the recording for easy identification (e.g., "After Hours Greeting").
- b. File: Select the audio file from your computer.
- Note: Recommended formats: WAV, MP3.
- 5. Click Upload.

- Your recording will now be available for use in Voicemails, IVRs, Ring Groups, and more!
🔊 Configuring Conference with VoIP.ms
- To recreate VoIPo’s Conference feature using VoIP.ms, follow the steps below.
Step 1: Create an Audio Conference
- 1. Log into your VoIP.ms portal.
- 2. Navigate to DID Numbers > Audio Conferencing.

- 3. Click Add Conference.
- 4. Fill out the fields under each tab:
- A. Information Tab
- 1. Name: A recognizable name for your audio conference.
- 2. Description: A short internal note (optional).
- 3. Maximum Participants: Leave as 0 for unlimited participants or set a cap.
- 4. Language: Choose the system voice prompt language.
- A. Information Tab
- B. Participants and Conference Settings
- 1. Click Add Profile.
- 2. For each profile:
- a. Create a Profile Name (e.g., "Admin", "User").
- b. Add a Description.
- c. Set a PIN (especially for Admins).
- d. Toggle Admin Rights if needed.
- 3. Click Save.
- B. Participants and Conference Settings
- Repeat as needed to create separate admin/user profiles.
- Tip: You can create one admin profile with a PIN and one regular user profile without a PIN for general participants.
Step 2: Add Custom Recordings (Optional)
- If you'd like custom audio prompts (e.g., "A user has joined"), you can upload them:
- 1. Go to DID Numbers > Recordings
- 2. Upload the relevant files
- 3. For detailed instructions, see the Recordings Guide here
Step 3: Save and Route Your DID
- 1. Click Save Conference to finalize setup.
- 2. To route a phone number to your conference:
- a. Go to DID Numbers > Manage DIDs

- b. Click the yellow Edit icon next to your desired DID

- c. In Routing Settings, select Audio Conferencing
- d. From the dropdown, choose the specific conference you created
- e. Scroll to the bottom and click Click here to apply changes
- Your VoIP.ms conference setup is now active and mirrors VoIPo’s functionality!
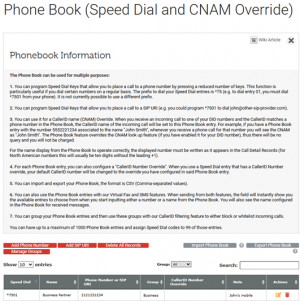
📖 Creating and Populating Your Directory
- If you used the Directory feature in VoIPo, you can replicate this functionality in VoIP.ms by using the Phone Book feature. This allows you to manage contacts and enable speed dial functionality.
Step 1: Accessing the Phone Book
- 1. Log into your VoIP.ms portal.
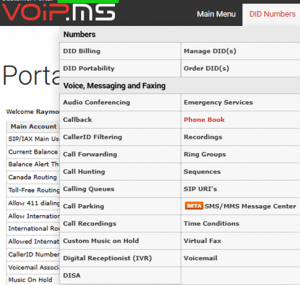
- 2. Navigate to DID Numbers > Phone Book.
- 1)
 2)
2) 
- 1)


Option 1: Manually Add a Contact
- 1. Click Add Phone Number.
- 2. Fill out the fields:
- a. Speed Dial: Choose a star code and 4-digit number (e.g., *7501) to quickly dial this contact.
- b. Name: Enter the contact’s name.
- c. Phone Number: Enter the full number (with country code if needed).
- d. Caller ID Number Override: Leave as-is unless you have specific needs.
- e. Group: Optional; leave as-is if not organizing into groups.
- Note: Optional; for personal notes about the contact.
- 3. Click Save to add the entry.
Option 2: Import Contacts via CSV
- 1. Prepare a CSV file with your contact list, using comma-separated values.
- 2. Upload the file using the Import feature on the Phone Book page.
- 3. Review the imported entries and make any necessary edits.
- 4. Once added, contacts can be quickly dialed using your assigned speed dial codes on supported devices or softphones.
🔔 Creating a Ring Group (VoIPo Equivalent: "Group")
- If you're transitioning from VoIPo and used the Group feature, VoIP.ms provides equivalent functionality through Ring Groups. A Ring Group allows multiple destinations—such as sub accounts and call forwarding entries—to ring simultaneously or sequentially when a call is received.
Prerequisites
- Before creating a Ring Group, ensure you've set up the following:
- Call Forwarding Entries → Call Forwarding Setup
- Sub Accounts → Sub Account Setup
Step 1: Create a Ring Group
- 1. Log into your VoIP.ms portal.
- 2. Navigate to DID Numbers > Ring Group.

- 3. Click Create New Ring Group.
- 4. Fill in the Configuration Fields
- a. Description: A name to help you identify the Ring Group (e.g., "Sales Team").
- b. Caller Announcement:Choose a pre-set VoIP.ms default announcement, Or upload a custom audio file (see Recording Setup Section).
- c. Language: Leave as-is unless you're using a VoIP.ms default announcement in another language.
- d. Members: Select up to 8 sub accounts and 4 call forwarding entries to include in the group.
- e. Voicemail: Choose a specific voicemail box to handle missed calls if desired (see Voicemail Setup Section),or leave blank to skip voicemail routing.
- 5. Click Save Changes.

Step 2: Route Your DID to the Ring Group
- 1. Go to DID Numbers > Manage DIDs.
- 2. Click the yellow Edit icon next to the DID you want to assign.
- 3. In the Routing Settings, select Ring Group.
- 4. From the dropdown, choose your newly created Ring Group.
- 5. Make sure that your DID's Point of Presence (POP) is set to the same server your device(s) are registered on.
- 6. Scroll to the bottom of the page and click Click here to apply changes.
- Your Ring Group is now active and receiving calls through your assigned DID!
📞 Creating a Call Forwarding Entry
- Call Forwarding in VoIP.ms allows you to redirect incoming calls to another phone number—such as your mobile device or another destination. Follow these steps to create and activate a forwarding rule.
Step 1: Create a Call Forwarding Entry
- 1. Log in to your VoIP.ms portal.
- 2. Go to DID Numbers > Call Forwarding.

- 3. Click Add Forwarding.
- 4. Fill out the following fields:
- a. Phone Number: The destination number for forwarded calls (e.g., your mobile).
- b. CallerID Number Override: Leave this as-is unless you need to modify the caller ID.
- c. Description: A label to easily identify this forwarding entry (e.g., "Forward to Cell").
- d. DTMF Digits (optional): Use if forwarding to an IVR system and digits must be dialed automatically.
- e. Pause (optional): Sets delay before and between DTMF tones.
- f. Diversion Header: Leave as-is unless instructed otherwise by your provider.
- g. Click Save.

Step 2: Assign Call Forwarding to a DID
- 1. Navigate to DID Numbers > Manage DIDs.
- 2. Click the yellow Edit icon next to the DID you want to configure.
- 3. Under Routing Settings, select Call Forwarding from the dropdown.
- 4. Choose the correct forwarding entry you created.
- 5. Scroll to the bottom and click Click here to apply changes.
🤖 Creating an IVR (VoIPo Equivalent: "Digital Receptionist")
- The Digital Receptionist (IVR) in VoIP.ms allows you to route incoming calls based on caller input (e.g., "Press 1 for Sales"). This is equivalent to the IVR feature in VoIPo.
Prerequisites
- Before creating your IVR, you’ll need to set up the destinations your IVR will route to, such as:
- Voicemail Boxes → Voicemail Setup
- Ring Groups → Ring Groups Setup
- Sub Accounts → Sub Accounts Setup
- Call Forwarding Entries → Call Forwarding Setup
Step 1: Create a Digital Receptionist (IVR)
- 1. Log into your VoIP.ms portal.
- 2. Go to DID Numbers > Digital Receptionist (IVR).

- 3. Click Create a New IVR.
- 4. Configure Your IVR Options. For each entry (choice), fill in the following:
- a. Digit: The number (e.g., 1, 2, 3) the caller will press on their phone.
- b. Destination: Where the call will be routed (e.g., Sub Account, Ring Group, Voicemail).
- c. Option: Choose the specific item under the selected destination (e.g., "Sales Ring Group").
- d. Click + Add Another Choice to insert additional menu options. You can add as many choices as needed.

- 🔁 Special Behavior Options
- Invalid Entry Handling: Use i in the Digit field to define what happens if a caller presses an invalid key.
- No Input Handling: Use t in the Digit field to define the action if the caller does not press any key.
Step 2: Save and Assign the IVR to a DID
- 1. Click Save IVR when your menu setup is complete.
- 2. Go to DID Numbers > Manage DIDs.
- 3. Click the yellow Edit icon next to your DID.
- 4. Under Routing Settings, select IVR.
- 5. From the dropdown, choose your newly created IVR entry.
- 6. Make sure the DID's Point of Presence (POP) is set to the same server your devices or destinations are using for proper call handling.
- 7. Scroll to the bottom and click Click here to apply changes.
🕒 Creating a Schedule
- VoIP.ms offers Time Conditions to control how calls are routed based on time and day. This feature matches VoIPo's Schedule functionality and lets you define different routing paths for business hours vs. after-hours.
Prerequisites
- Before creating a Time Condition, make sure you’ve already configured:
- Voicemails → Voicemail Setup
- Ring Groups → Ring Groups Setup
- Sub Accounts → Sub Accounts Setup
- Call Forwarding → Call Forwarding Setup
- IVRs → IVR Setup
Step 1: Create a Time Condition
- 1. Log into your VoIP.ms portal.
- 2. Navigate to DID Numbers > Time Condition.

- 3. Click Create a New Time Condition.
- 4. Complete the following fields:
- a. Time is 'from'... 'to', and day is 'from'... 'to': Define the time range and days of the week this condition should apply (e.g., 9:00 AM to 5:00 PM, Monday to Friday).
- b. Destination if one of the conditions matches server time: Select where calls should route during this time window (e.g., a ring group or sub account).
- c. Destination if no condition matches server time: Set where calls should go outside the defined time (e.g., voicemail or call forwarding).
- 5. Name of the Condition: Give the condition a name for easy identification (e.g., “Business Hours”).
- 6. Click Save Time Condition.

Step 2: Assign the Time Condition to a DID
- 1. Go to DID Numbers > Manage DIDs.
- 2. Click the yellow Edit icon next to the DID you want to assign.
- 3. Under Routing Settings, select Time Conditions.
- 4. Choose the condition you created from the dropdown list.
- 5. Be sure the DID’s Point of Presence (POP) is set to the same server your device or routing destination uses to ensure reliable call handling.
- 6. Scroll to the bottom and click Click here to apply changes.
📬 Creating a Voicemail
- VoIP.ms allows you to create and fully customize voicemail boxes for your main account, sub accounts, or DID numbers—similar to how VoIPo handles voicemail.
Step 1: Create a Voicemail Box
- 1. Log in to your VoIP.ms portal.
- 2. Go to DID Numbers > Voicemail.

- 3. Click Create New Voicemail.
- 4. In the top-right corner, click View Advanced Mode to access all settings.
- 5. Fill in the following fields:
- a. Voicemail Number: 1 to 10 digits (e.g., 1001). This uniquely identifies the mailbox.
- b. Name: A name for easy identification (e.g., “Support Team”).
- c. Password: A 4-digit PIN to access voicemail.
- d. Skip Password Prompt: Leave as-is unless using trusted device access.
- e. Unavailable Message Recording: Upload a pre-recorded message (see Recording Setup), or dial *97 from a registered device after setup to record a greeting.
- f. Voicemail Transcription: Enable to receive text transcripts of voicemails.
- g. Transcription Redaction: Hides sensitive content (e.g., credit card numbers).
- h. Transcription Delay: Leave as-is.
- i. Notification Email: Where recordings and/or transcriptions will be sent.
- k. Attach Message to Email: Sends audio recording along with the email.
- l. Delete Voicemail Message: Auto-delete from the portal after email delivery (helps manage storage).
- m. Attachment Format: Choose audio file format (e.g., WAV or MP3).
- n. Voicemail Language: Voice prompts and menu language when accessing via *97.
- o. Say Instructions / Say Time/Date: Leave as-is unless custom behavior is required.
- p. Time Zone: Select your correct local time zone.
- q. Say Caller ID: System announces the number of the person who left the message.
- 6. Click Create Voicemail to save.

Step 2: Assign Voicemail to the Proper Destination
📌 Assign to the Main Account
- 1. Go to Main Menu > Account Settings > General tab.
- 2. Find Voicemail Associated to the Main Account, select your voicemail from the dropdown, and Save.

📌 Assign to a Sub Account
- 1. Navigate to Sub Account > Manage Sub Account.
- 2. Click Edit on the desired sub account.
- 3. Scroll down to Internal Extension Voicemail, select the mailbox, then click Update Account.

📌 Assign to a DID Number
- 1. Go to DID Numbers > Manage DIDs.
- 2. Click the yellow Edit icon next to your DID.

- 3. Scroll to Voicemail Associated with DID under DID Point of Presence.
- 4. Select your voicemail from the dropdown.
- 5. Scroll down and click Click here to apply changes.
🧠FAQ
Why can't you access my VoIPo account?
VoIP.ms and VoIPo are entirely separate companies. We do not have access to VoIPo’s systems, accounts, or customer data. Your VoIP.ms account is completely independent.
Can you transfer my VoIPo service history?
No. Since we cannot access your VoIPo account, we’re unable to transfer service history, call records, or other account data. Your VoIP.ms account begins with a clean slate. For past records, please reach out to VoIPo directly.
Will VoIP.ms honor my VoIPo contract terms?
No. VoIP.ms operates under its own terms and pricing. However, VoIPo customers are eligible for special migration benefits when switching to VoIP.ms.
Who should I contact about VoIPo problems?
For any issues related to your VoIPo account—including billing, service, refunds, or account access—please contact VoIPo directly at [email protected]. VoIP.ms support is limited to VoIP.ms services only.
Will I get the same features I had with VoIPo?
VoIP.ms offers a robust feature set, though it may differ from what VoIPo provided. Our features include call forwarding, voicemail-to-email, auto-attendant, conference calling, and more. You can view a full list at https://voip.ms/features. We’re happy to help you explore features that meet your needs.
Can you set up my account exactly like my VoIPo account?
We cannot replicate your VoIPo setup, as we do not have access to their configuration data. Your VoIP.ms account will be built from the ground up using the tools and features we provide. We’ll work with you to configure it in a way that best suits your needs.
Why is VoIP.ms pricing different from VoIPo?
As independent providers, VoIP.ms and VoIPo have different pricing structures. While we can’t match VoIPo’s rates or honor existing contracts, our transparent pay-as-you-go model often delivers excellent value. Plus, VoIPo customers receive a $10 credit on their initial deposit with VoIP.ms.
Why do I need to make a deposit if I already paid VoIPo?
Payments made to VoIPo do not carry over to VoIP.ms, as we are separate companies with independent billing systems. The initial deposit activates your VoIP.ms account and includes a $10 welcome credit for VoIPo customers.
What happens if I don't migrate to VoIP.ms?
You're welcome to choose any provider that meets your needs. VoIP.ms is offering special benefits to VoIPo customers to make the transition easier, but there’s no obligation to switch to us. If you select another provider, please coordinate with them for your migration.
Why should I choose VoIP.ms over other providers?
VoIPo customers migrating to VoIP.ms receive exclusive perks: a $10 credit, free number porting, and personalized migration support. Beyond that, VoIP.ms is known for its reliable service (99.9% uptime), transparent pricing, responsive 24/7 support, and over 15 years of experience in VoIP communications.
Did VoIP.ms take over VoIPo?
No. VoIP.ms and VoIPo are completely separate businesses. VoIP.ms created this migration offer simply to support VoIPo customers looking for a new provider.