VTScada
From VoIP.ms Wiki

VTScada is an industrial automation and SCADA platform developed by Trihedral. Among its alarm notification features, VTScada can use SIP-based Voice over IP (VoIP) services to place automated voice calls and, when supported, exchange SMS messages with alarm recipients.
This article describes how to configure VTScada for use with VoIP.ms.
The configuration presented in this guide uses a dedicated VoIP.ms Sub Account. Although the Main Account may also be used, a dedicated Sub Account is recommended when possible because it provides separate SIP credentials and prevents registration conflicts with other SIP devices or applications.
Note: VTScada is a third-party application and is not developed or maintained by VoIP.ms. Menu names and available options may vary between VTScada versions.
Requirements
Before configuring VTScada, you should have:
- An active VoIP.ms account with available balance.
- A VoIP.ms SIP account or preferably a dedicated Sub Account.
- A VoIP.ms POP server selected for the connection.
- A valid outbound Caller ID.
- A DID number if incoming calls or SMS functionality will be used.
- VTScada installed and configured with the Alarm Notification System.
- Internet access from the VTScada workstation to the selected VoIP.ms POP.
If SMS notifications or SMS acknowledgement will be used:
- The DID must support SMS.
- SMS/MMS must be enabled for the DID.
- Incoming SMS messages must be routed to the SIP account used by VTScada.
Creating a VoIP.ms Sub Account
Although VTScada can be configured with the VoIP.ms Main Account, using a dedicated Sub Account is recommended.
To create one:
- 1. Log in to the VoIP.ms Customer Portal.
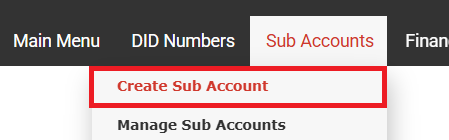
- 2. Navigate to:
- Sub Accounts → Create Sub Account
-

- 3. Configure the following basic options:
- Protocol: SIP
- Authentication Type: User/Password Authentication
- Username: Enter a name that identifies the VTScada system, for example:
vtscada
- Password: Enter a strong and unique SIP password.
- Caller ID Number: Select the DID or verified Caller ID that VTScada should present for outbound calls.
- Encrypted SIP Traffic: Yes
The resulting SIP username will use the following format:
123456_vtscada
Where:
- 123456 represents your VoIP.ms account number.
- vtscada represents the Sub Account username.

Click Create Account to save the configuration.
For additional information regarding Sub Accounts, refer to Sub Accounts.
Selecting a VoIP.ms POP Server
VTScada must register to one of the VoIP.ms SIP servers.
Select a server that is geographically appropriate for the VTScada installation. For example:
montreal1.voip.ms
The same server should also be selected as the POP for any DID that will be routed directly to the VTScada SIP account.
For more information about available servers, refer to Choosing a Server.
Important: If the DID is configured on a different POP than the server used by VTScada, incoming calls may not reach the application correctly.
Configuring the DID
A DID is not necessarily required when VTScada will only place outbound voice calls.
A DID is required when the installation will use features such as:
- Receiving calls through the VoIP.ms number.
- Sending SMS from a VoIP.ms number.
- Receiving SMS messages.
- Alarm acknowledgement through SMS.
To configure the DID:
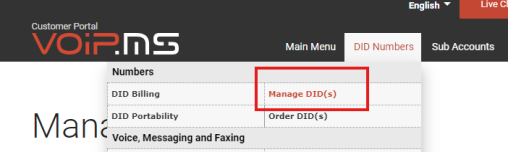
- 1. From the VoIP.ms Customer Portal, navigate to:
- DID Numbers → Manage DID(s)
-

- 2. Locate the DID and click the Edit icon.
-

DID POP
Ensure that the DID Point of Presence (POP) corresponds to the same VoIP.ms server configured in VTScada.
For example:
montreal1.voip.ms
-

DID Routing
If incoming SIP calls should be delivered directly to VTScada:
- 1. Locate the DID Routing section.
- 2. Select the SIP/IAX routing option.
- 3. Select from the drop-down menu, the Sub Account created for VTScada.
For example:
123456_vtscada
-

- 4. Save the DID configuration.
SMS Configuration
If VTScada will use SMS notifications or SMS acknowledgement, SMS must first be enabled on the VoIP.ms DID.
From:
- DID Numbers → Manage DID(s)
-
Edit the desired DID and locate:
- Message Service (SMS/MMS)
Enable the SMS/MMS service.

Then enable the option to route received SMS messages to a SIP Account and select the VTScada Sub Account.
For example:
123456_vtscada
The SIP account must be successfully registered with VoIP.ms for incoming SIP MESSAGE requests to reach VTScada.
Important: Avoid registering the same SIP Sub Account simultaneously on VTScada and another SIP application. Doing so may cause calls or SMS messages to be delivered to the wrong registration.
Note: SMS functionality should be thoroughly tested before relying on SMS acknowledgement for production alarm handling.
SIP Encryption
VoIP.ms supports SIP signaling encryption using TLS and media encryption using SRTP.
If encrypted SIP traffic will be used with VTScada, enable this option on the VTScada Sub Account.
Navigate to:
- Sub Accounts → Manage Sub Accounts
Edit the VTScada Sub Account, and set:
- Encrypted SIP Traffic: Yes
Save the configuration.
Important: Once Encrypted SIP Traffic is enabled for the Sub Account, the SIP client must also be configured to use TLS/SRTP. Standard unencrypted SIP registrations for that Sub Account will no longer be accepted.
For additional information, refer to Call Encryption - TLS/SRTP.
Configuring VTScada
Once the VoIP.ms SIP account has been prepared, VTScada can be configured.
From the VTScada application:
- 1. Open the Application Configuration dialog.
- 2. Select Edit Properties.
- 3. Make sure the configuration is displayed in Basic Mode.
- 4. Select the Alarms tab.
- 5. Scroll to the VOIP Settings section.

Enable VoIP Calls
Enable:
- Enable VOIP Calls
This allows the Alarm Notification System to place voice calls using the configured VoIP.ms SIP account.
If SMS functionality will also be used, enable:
- Enable VOIP SMS
Workstation
Select the workstation that will act as the Alarm Notification Server.
When multiple VTScada workstations are present, it is recommended to explicitly select the appropriate workstation rather than leaving the option set to Default.
SIP Identity
Enter the SIP identity using the VoIP.ms Sub Account and selected POP.
The general format is:
VTScada <sip:[email protected]>
For example:
VTScada <sip:[email protected]>
If the VoIP.ms Main Account is used instead, the format would be similar to:
VTScada <sip:[email protected]>
SIP Server
Enter the selected VoIP.ms POP as a SIP URI.
For example:
sip:montreal1.voip.ms
SIP Proxy
When required by the VTScada configuration, use the same VoIP.ms POP server.
For example:
sip:montreal1.voip.ms
SIP Domain
Enter the hostname of the selected VoIP.ms server without the sip: prefix.
For example:
montreal1.voip.ms
VTScada uses the SIP Domain when constructing SIP URIs for destinations stored as regular telephone numbers.
SIP Login User ID
Enter the complete VoIP.ms SIP username.
For a Sub Account:
123456_vtscada
For the Main Account:
123456
SIP Password
Enter the SIP password associated with the account being used.
When using a Sub Account, this is the password configured when the Sub Account was created.
Do not enter the VoIP.ms Customer Portal password when using a Sub Account.
Example Configuration
A typical VTScada configuration using a VoIP.ms Sub Account might therefore appear as follows:
- Enable VOIP Calls:
- Enabled
- Enable VOIP SMS:
- Enabled, if required
- Workstation:
- The workstation hosting the Alarm Notification System
- SIP Identity:
VTScada <sip:[email protected]>
- SIP Server:
sip:montreal1.voip.ms
- SIP Proxy:
sip:montreal1.voip.ms
- SIP Domain:
montreal1.voip.ms
- SIP Login User ID:
123456_vtscada
- SIP Password:
- The password configured for the VTScada Sub Account.
Replace the example account number, username and server with the information from your own VoIP.ms account.
Telephone Number Format
When telephone numbers are entered directly into a VTScada roster, use complete telephone numbers.
For calls within the North American Numbering Plan (NANPA), using the complete 11-digit number is recommended.
For example:
15145551234
Avoid spaces, parentheses and hyphens.
For example, instead of:
(514) 555-1234
use:
15145551234
VTScada combines the destination with the configured SIP Domain when creating the SIP URI used to place the call.
Configuring a Roster Tag
After the SIP connection has been configured, create or modify a VTScada Roster Tag to define which users will receive alarm notifications.
In VTScada:
- 1. Create or edit the desired Roster Tag.
- 2. Under the ID tab, configure the identifying information for the roster.
- 3. Open the Contacts tab.
- 4. Select:
- + Add Contact
- 5. Add the telephone number or SMS destination for each alarm recipient.
- 6. Open the Settings tab.
- 7. Configure the trigger conditions that will activate the roster.
During initial testing, it may be useful to configure only one recipient and a short notification delay.
Once the configuration has been validated, configure the final notification sequence required by the installation.
User Identification Codes
VTScada can require users receiving voice alarm notifications to authenticate before acknowledging an alarm.
For each applicable VTScada user:
- 1. Open Accounts.
- 2. Select the user.
- 3. Locate Alternate Identification.
- 4. Configure a numerical identification code or PIN.
- 5. Apply the changes.
Provide the appropriate identification code to the corresponding alarm recipient.
Testing the Configuration
Before placing the configuration into production, verify both the VoIP.ms SIP registration and the VTScada alarm notification process.
Verify SIP Registration
Log in to the VoIP.ms Customer Portal and navigate to the Portal Home.
Locate the Sub Account Registration Status section.
The VTScada Sub Account should appear as registered.
For example:
123456_vtscada Registered
If the Sub Account does not appear as registered, verify:
- SIP username.
- SIP password.
- VoIP.ms server hostname.
- Network or firewall configuration.
- TLS configuration, if encryption is enabled.
Test Outbound Calls
Configure a temporary Roster contact using a telephone number that can be answered during testing.
Generate a test alarm and verify that:
- VTScada initiates the call.
- The destination telephone rings.
- The alarm announcement can be heard.
- DTMF input is recognized.
- The alarm can be acknowledged successfully.
Test SMS
If SMS is enabled:
- Send an alarm notification by SMS.
- Confirm that the message is received.
- Send the required acknowledgement response.
- Confirm that VTScada receives and processes the response.
Do not rely on SMS acknowledgement in production until the complete send-and-response process has been successfully tested.
Testing with a Softphone
When troubleshooting, a SIP softphone such as MicroSIP can be temporarily configured with the same VoIP.ms credentials to verify that the account itself is operating correctly.
This can help distinguish between:
- A VoIP.ms account configuration problem.
- Incorrect SIP credentials.
- A network or firewall issue.
- A VTScada configuration issue.
Important: Disconnect the softphone before starting VTScada again.
Using the same SIP account simultaneously in both applications can cause registration and routing conflicts.
Whenever possible, separate VoIP.ms Sub Accounts should be used when multiple SIP applications must remain registered at the same time.
Advanced VTScada Settings
VOIPPickUpDelay
VTScada includes the advanced property:
VOIPPickUpDelay
This value determines the interval between the start of a VoIP call and the beginning of the voice announcement.
The VTScada default is normally 10 seconds.
Depending on the telephone network and destination, a shorter value may provide faster alarm announcements.
For example:
VOIPPickUpDelay = 2
This setting should be tested carefully since beginning playback too quickly may cause the beginning of the alarm message to be missed.
VOIPPort
VTScada normally uses the standard SIP port configured by the application.
If another SIP application on the same workstation is already using the local SIP port, VTScada allows its local VoIP port to be changed through its Setup.INI configuration.
For example:
VOIPPort = 5062
After modifying Setup.INI, restart VTScada.
Changing the local VTScada SIP port normally does not require changing the VoIP.ms server hostname.
Troubleshooting
Registration Fails
If VTScada cannot register with VoIP.ms:
- Confirm that the SIP Login User ID contains the complete Sub Account username.
- Example:
123456_vtscada
- Confirm the SIP password.
- Confirm that the correct VoIP.ms POP hostname is being used.
- Check the registration status from the VoIP.ms Customer Portal.
- Confirm that TLS/SRTP settings match the Encrypted SIP Traffic setting of the Sub Account.
- Confirm that a firewall is not blocking SIP or RTP traffic.
SIP 401 or 403 Errors
VTScada's communication logs may contain SIP response codes such as:
401 Unauthorized
or:
403 Forbidden
These generally indicate that authentication was unsuccessful.
Verify:
- SIP Login User ID.
- SIP password.
- SIP server.
- Encryption configuration.
- That another application is not simultaneously using the same SIP credentials.
Outbound Calls Work but Incoming Calls Do Not
Verify:
- The DID is routed to the correct SIP Account.
- VTScada is successfully registered.
- The DID POP matches the VoIP.ms server used by VTScada.
For example, if VTScada registers to:
montreal1.voip.ms
the DID should normally also use:
montreal1.voip.ms
Calls Connect but There Is No Audio
If a call connects but audio is missing in one or both directions:
- Verify the firewall configuration.
- Verify that RTP traffic is permitted between the VTScada workstation and VoIP.ms.
- Check for SIP ALG on the router and disable it when it interferes with SIP communication.
- Review the VTScada VoIP communication logs.
SMS Can Be Sent but Replies Are Not Received
Verify:
- SMS/MMS is enabled on the DID.
- The DID is configured to route received SMS messages to the VTScada SIP Account.
- The VTScada SIP Account is registered.
- The same SIP account is not registered simultaneously on another application.
- TLS settings are consistent between VTScada and VoIP.ms.
Viewing VTScada VoIP Logs
VTScada can generate VoIP communication logs for troubleshooting.
These logs are normally stored under:
VTScada\TraceFiles\VOIPLogs
Review the logs for SIP registration errors, rejected requests and authentication responses.
The logs can be particularly useful when determining whether a problem occurs before or after communication reaches the VoIP.ms server.
Security Recommendations
Because VTScada may be responsible for critical alarm notifications, additional security measures are recommended.
- Use a dedicated VoIP.ms Sub Account for VTScada.
- Use a strong and unique SIP password.
- Do not expose the VTScada management interface directly to the public Internet.
- Consider enabling TLS/SRTP.
- Consider using VoIP.ms POP and IP restrictions where appropriate.
- Disable international calling on the Sub Account if it is not required.
- Restrict outbound calling capabilities to only those services required by the installation.
- Regularly verify that alarm notifications are operating correctly.
Refer to General Security for additional VoIP.ms security recommendations.
See Also
VTScada Documentation
The following VTScada documentation provides additional information about the Alarm Notification System and VoIP configuration:

