Hello Gubby
From VoIP.ms Wiki

Hello Gubby is an AI receptionist platform that grows into the AI front desk for your business.
Your AI receptionist answers every call in seconds with natural, human-sounding voices. It greets callers with your business name or a greeting of your choice, and answers questions about your services. It captures lead details and books appointments. When a caller needs a person, it warm transfers the call to you or your team, with unlimited warm transfers and unlimited notification recipients at no extra cost.
Every call is captured. After each call, you receive a summary, transcript, and recording on your email, in your Hello Gubby account, and in your CRM. Connect GoHighLevel or HubSpot directly from your Hello Gubby account, or sync your calendar for bookings. Webhooks are live, and Zapier is coming soon.
Hello Gubby is a no-code platform designed for busy business owners who need a done-for-you (DFY) setup at do-it-yourself (DIY) prices. Train your AI receptionist from your website or upload company materials, and go live in less than 5 minutes. When you are ready, add your AI receptionist to talk to your website visitors over voice or chat, and upload your own video or an AI receptionist video to give life to your website.
For more details or to sign up, visit: hellogubby.ai
Contents |
Before you start
To connect a number to Hello Gubby you will need:
- A VoIP.ms account with an active DID (phone number). If you don't have a number yet, follow: Order a DID Number
- You can leave the routing settings at their default values during the purchase. You will configure routing based on your use case (i.e., all calls answered by your AI receptionist, missed calls only, etc.) later in this guide.
- The DID on the pay as you go plan.
- 🚨 Plan type
Flat rate plans are limited to 2 simultaneous incoming calls, which limits how many callers your AI receptionist can answer at the same time. The pay as you go plan has no such restriction and is the recommended plan for AI receptionists. To change your plan, see the Changing DID Billing Plan article on this wiki.
- A Hello Gubby account on a paid plan. Sign up at hellogubby.ai. Each plan comes with a 7-day free trial so try before you pay.
Hello Gubby configuration
After you sign up, you can explore your Hello Gubby portal and test your AI receptionist before paying. You can set up your receptionist, modify its settings, and make a web call to listen to it, all without putting in your credit card. See this video walkthrough of the sign up and setup: How to sign up for Hello Gubby
Once you pay, your subscription is active and you are navigated from Stripe back to your Hello Gubby portal, which takes you to your business number setup. You will see the You're live! confirmation, as shown below.
Connecting your number
- On the You're live! Confirmation screen, click on Continue.
-
- Choose how you want your AI front desk to answer calls: select Bring your own number, then click on Continue.
-
- You are taken to the SIP Trunk section of your settings. Click on the VoIP.ms card.
-
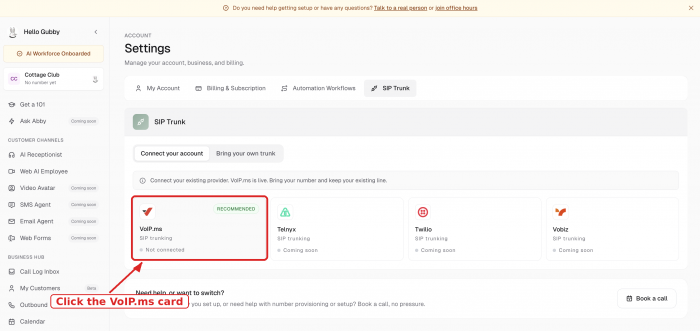
- If you skipped this step after payment, you can reach it anytime from Settings >> SIP Trunk in your Hello Gubby dashboard.
-
- Your VoIP.ms phone number: Enter your VoIP.ms DID with your country code (E.g. +1 778 819 7943).
- Click on Connect.
-


Copy your SIP address
Once your number is connected, Hello Gubby shows it as your AI front desk line and displays your SIP address, along with the steps to complete in VoIP.ms.
- Click on Copy next to the SIP address.
- 🚨 Copy the address exactly
Paste the address in VoIP.ms exactly as shown, with your number at the front. A shortened address without the number still connects calls, but your AI receptionist cannot tell which number was dialed and will answer with a generic greeting instead of your business greeting. 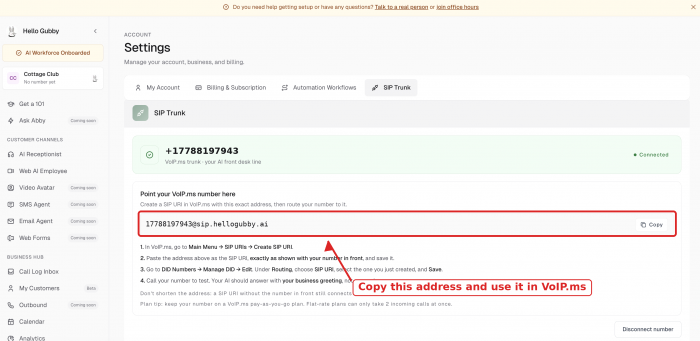

The next section walks you through the two steps in your VoIP.ms portal.
VoIP.ms configuration
You will now use the SIP address you copied from Hello Gubby in two places in your VoIP.ms portal: first to create a SIP URI, then to route your number to it.
Create the SIP URI
- In your VoIP.ms portal, go to DID Numbers >> SIP URI's.
- Click on Add SIP uri.
- SIP URI: Paste the address you copied from your Hello Gubby dashboard.
- 🚨 The sip: prefix is already there
The field starts with sip: on its left. Paste only the address as copied (E.g. [email protected]). Do not type sip: again.
- Description: Any name of your choice (E.g. Hello Gubby AI Receptionist).
- CallerID Override: Select I use a system capable of passing its own CallerID.
- CallerID E164: Leave as Disabled.
- Click on Save.


Your SIP URI is created and appears in the list.

Open your DID settings
- Go to DID Numbers >> Manage DID(s).
- Find your VoIP.ms number and click on the Edit DID (pencil) icon.


Update the DID routing
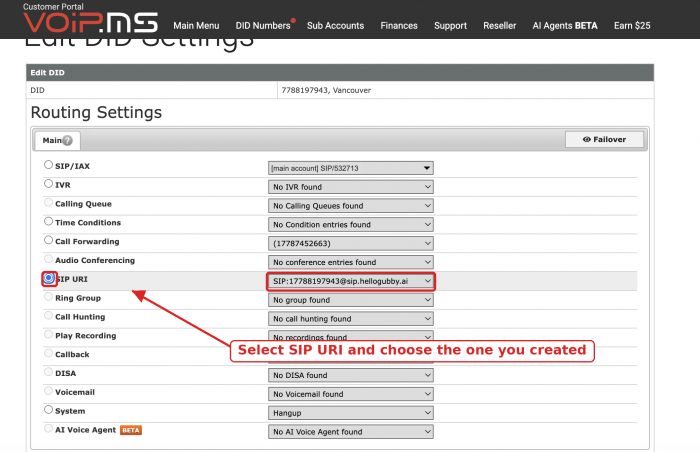
- Under Routing Settings, select SIP URI.
- In the dropdown next to it, choose the SIP URI you created.
- 🚨 Select the radio button, not just the dropdown
Your SIP URI appearing in the dropdown is not enough. The round radio button next to SIP URI must be selected, or calls will keep going to the previous destination. - 🚨 This option routes ALL calls to your AI receptionist
With SIP URI selected as your Main routing, every call to this number is answered by your AI receptionist. If you want your phone to ring first and your AI receptionist to answer only missed calls, or other setups, see Choosing when your AI receptionist answers below. -
- Scroll down and click on Apply Changes.

That's it! Every call to your VoIP.ms number is now answered by your AI receptionist. To have your AI receptionist answer only some calls instead, continue to the routing options below.
Test your number
Call your VoIP.ms number from any phone.
Your AI receptionist should answer within a few seconds with your business greeting, for example: "Thanks for calling Bright Nest Cleaning, this is Filzah. How can I help you today?"
Then check your Hello Gubby dashboard: the call appears in your Call Log Inbox within a minute, with the summary, transcript, and recording.
If your AI receptionist answers with a generic Hello Gubby greeting instead of your business greeting, the SIP URI in VoIP.ms is missing your number at the front. Edit it under DID Numbers >> SIP URI's so it exactly matches the address shown in your Hello Gubby dashboard, with your number in front.
Choosing when your AI receptionist answers
The setup above routes every call to your AI receptionist. VoIP.ms routing gives you other options depending on how you want to run your business. All of them are configured on the same Edit DID Settings page, and none of them require any change in your Hello Gubby account.
Your AI receptionist answers every call
The default setup from this guide: Main routing = SIP URI. Your AI receptionist answers every call in seconds, 24/7, and warm transfers callers to you or your team when needed. Best for businesses that miss calls during jobs, after hours, or at busy times, and want every call captured.
Your phone rings first, your AI receptionist answers missed calls
Your phone rings normally, and your AI receptionist only picks up the calls you can't take. No call ever goes to voicemail again.
On your DID's Routing Settings, the tabs across the top control where calls go in each situation:
4. Main: set to where your phone is. Select SIP/IAX if you use a softphone registered to your VoIP.ms account, or Call Forwarding with your mobile number (create the forwarding entry first under DID Numbers >> Call Forwarding).

5. If Busy: select SIP URI and choose the one you created.
6. If Unreachable: select SIP URI and choose the one you created.
7. If No Answer: select SIP URI and choose the one you created.

8. Scroll down to Ring Time in seconds and set it to 20 s (~4 Rings). This is how long your phone rings before your AI receptionist takes the call.
9. Click on Apply Changes.
If your Main destination is call forwarding to a mobile phone, the mobile carrier's voicemail competes with this setup. If your carrier voicemail answers at 18 seconds and your VoIP.ms Ring Time is 20, voicemail takes every missed call before your AI receptionist can. Set your Ring Time shorter than your phone's voicemail delay, or disable your carrier voicemail. Softphone setups do not have this issue.
Now your phone rings first on every call. If you don't answer within the ring time, are on another call, or your phone is offline, your AI receptionist answers and captures the lead. For more details on forwarding entries, see: Call Forwarding
Business hours to your phone, after hours to your AI receptionist
Your team answers during the day, and your AI receptionist covers evenings, weekends, and holidays.
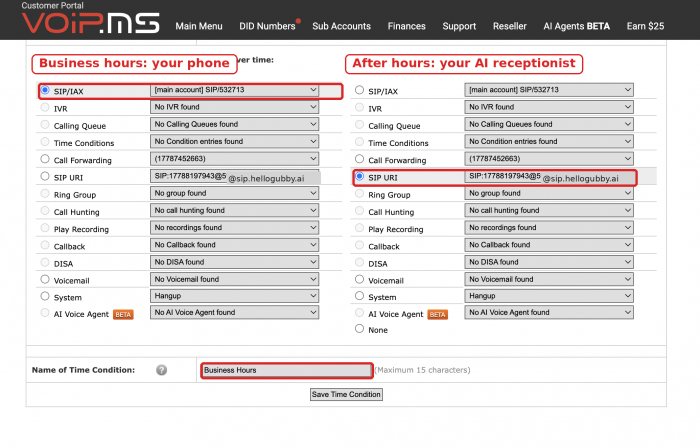
- 1. Go to DID Numbers >> Time Conditions and click on Create a new Time Condition.
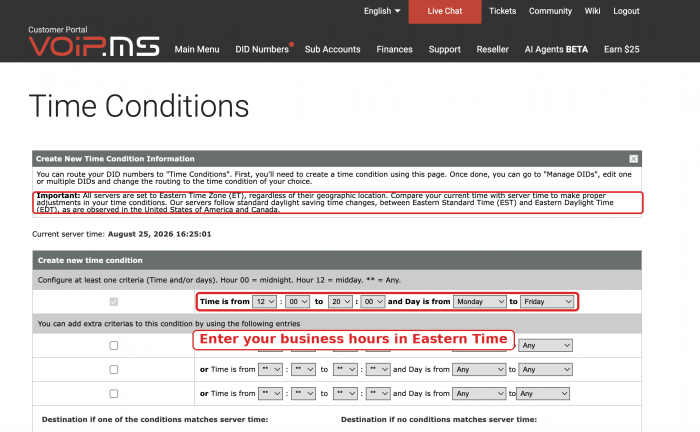
- 2. Set the time and day criteria for your business hours.
- 🚨 VoIP.ms servers run on Eastern Time
All VoIP.ms servers are set to Eastern Time, regardless of your location. Enter your hours converted to ET. For example, a Vancouver business open 9:00 to 17:00 Pacific enters 12:00 to 20:00. Compare your local time with the Current server time shown on the page. -
- 3. Destination if one of the conditions matches server time (during business hours): select where your phone is, for example SIP/IAX or Call Forwarding.
- 4. Destination if no conditions matches server time (after hours): select SIP URI and choose the one you created.
- 5. Name of Time Condition: Any name of your choice (E.g. Business Hours). Click on Save Time Condition.
-
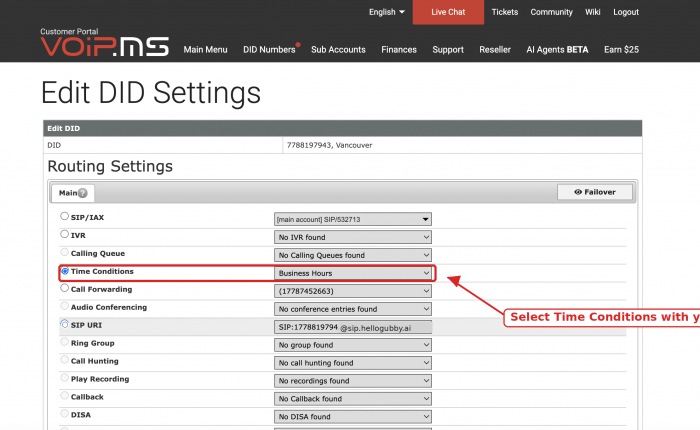
- 6. Go to DID Numbers >> Manage DID(s), edit your number, and under Routing Settings select Time Conditions with the condition you created. Click on Apply Changes.
-


Statutory holidays are not automatic: a time condition is a weekly schedule, so on holidays your phone still receives calls during the configured hours unless you temporarily adjust the condition. For more details, see: Time Conditions
Keep your existing main line and forward it to your AI receptionist
If your business number is with another provider and you don't want to move it, you can still use your AI receptionist. Set up call forwarding on your existing line (from your current provider's settings) to your VoIP.ms number, either for all calls or only when you don't answer. Your VoIP.ms number then routes to your AI receptionist as configured in this guide. Your published number never changes.
Some carriers replace the caller's number with the forwarding number when they forward a call. Make one test call and check the caller number shown in your Hello Gubby call log. Also note that forwarded calls are billed by both providers: your carrier's forwarding rate plus VoIP.ms per-minute usage.
Outbound calls and transfers
Warm transfers to your team and outbound calls from your VoIP.ms number: Coming soon!
Useful resources
- Hello Gubby: hellogubby.ai
- Hello Gubby sign up and setup video: YouTube walkthrough
- VoIP.ms SIP URI feature: SIP URI
- VoIP.ms DID ordering: Order a DID Number
- VoIP.ms DID plans: Changing DID Billing Plan
- VoIP.ms Time Conditions: Time Conditions
- VoIP.ms Call Forwarding: Call Forwarding
