Call2Teams for Microsoft Teams
From VoIP.ms Wiki
| [quality revision] | [draft revision] |
m (Minor copy editing. No changes to content.) |
|||
| Line 4: | Line 4: | ||
= Call2Teams Trunk = | = Call2Teams Trunk = | ||
| - | == Pre- | + | == Pre-requisites == |
:* You need to make a temporary spare user licence on Office 365 | :* You need to make a temporary spare user licence on Office 365 | ||
:* Your VoIP.ms sub account credentials and your DIDs number. ''(If you don't have a sub account, you can create one under your VoIP.ms Customer Portal under "Sub Accounts" then, "Create Sub Account" or use your existing sub account.)'' | :* Your VoIP.ms sub account credentials and your DIDs number. ''(If you don't have a sub account, you can create one under your VoIP.ms Customer Portal under "Sub Accounts" then, "Create Sub Account" or use your existing sub account.)'' | ||
| Line 15: | Line 15: | ||
| - | You will need to use your office 365 login. ''(Be sure that the email comes from your organisation that you need to setup your Microsoft Teams with Call2Teams and | + | You will need to use your office 365 login. ''(Be sure that the email address comes from your organisation that you need to setup your Microsoft Teams with Call2Teams, and has the global level access)''. |
:[[File:Call2Teams_Initial_Login365_usr.png|300px|border]] [[File:Call2Teams_Initial_Login365_pwd.png|300px|border]] | :[[File:Call2Teams_Initial_Login365_usr.png|300px|border]] [[File:Call2Teams_Initial_Login365_pwd.png|300px|border]] | ||
| Line 26: | Line 26: | ||
= Configure your Call2Teams users = | = Configure your Call2Teams users = | ||
| - | After giving the permissions by using a global admin email account | + | After giving the permissions by using a global admin email account, you will be redirected automatically to the Call2Teams Admin Portal. |
| - | Now you need to create a new Trunk. To do so, click on the '''"Service"''' tab, | + | Now you need to create a new Trunk. To do so, click on the '''"Service"''' tab, on the upper navigation bar. |
:[[File:Call2Teams_NAV_Services.png|800px]] | :[[File:Call2Teams_NAV_Services.png|800px]] | ||
| - | In this step, be sure you have | + | In this step, be sure you have the credentials of your VoIP.ms Sub Account. ''(If you don't have a sub account yet, you must create one by accessing your VoIP.ms portal.)'' |
Click on '''Trunk''' tab in your Call2Teams Admin Portal, and "Add a new trunk". | Click on '''Trunk''' tab in your Call2Teams Admin Portal, and "Add a new trunk". | ||
| Line 40: | Line 40: | ||
:[[File:Call2Teams_Services_Trunk_Create.png|800px|border]] | :[[File:Call2Teams_Services_Trunk_Create.png|800px|border]] | ||
| - | Now, you will need to specify your VoIP.ms sub account credentials and validate some | + | Now, you will need to specify your VoIP.ms sub account credentials and validate some information. |
:[[File:Call2Teams_Services_Trunk_Create_Voipms_P1.png|800px|border]] | :[[File:Call2Teams_Services_Trunk_Create_Voipms_P1.png|800px|border]] | ||
| Line 47: | Line 47: | ||
:* '''State/Province''': Your State | :* '''State/Province''': Your State | ||
| - | :* '''Range Start/Range End''': This will be your VoIP.ms DID(s), However you will need to add the sign + followed by the (country code) of the DID, then your DID. | + | :* '''Range Start/Range End''': This will be your VoIP.ms DID(s), However you will need to add the plus sign (+) followed by the (country code) of the DID, then your DID. |
| - | :: If you have more than one DID that you would like to add and they are not sequential, you will simply need to add the DID on the field '''START Range''' and the '''Range END'''. | + | :: If you have more than one DID that you would like to add, and they are not sequential, you will simply need to add the DID on the field '''START Range''' and the '''Range END'''. |
| - | :: You will need to add each DID separately by adding a new range by clicking on [+ Add Additional Range] | + | :: You will need to add each DID separately, by adding a new range, by clicking on [+ Add Additional Range] |
:[[File:Call2Teams_Services_Trunk_Create_Voipms_P2.png|800px|border]] | :[[File:Call2Teams_Services_Trunk_Create_Voipms_P2.png|800px|border]] | ||
| - | :* '''SIP Domain''': You will need to indicate the PoP Server that you would like to use with your Trunk. ''Be sure that your | + | :* '''SIP Domain''': You will need to indicate the PoP Server that you would like to use with your Trunk. ''Be sure that your DIDs are on the same PoP Server, in order to receive incoming calls.'' |
:* '''SIP Proxy''': ''- You must leave this option blank -'' | :* '''SIP Proxy''': ''- You must leave this option blank -'' | ||
:* '''Authenticate Type''': Select '''Registration''' | :* '''Authenticate Type''': Select '''Registration''' | ||
:* '''Username''': You will need to indicate your Sub Account Username. ''(######_Username)'' | :* '''Username''': You will need to indicate your Sub Account Username. ''(######_Username)'' | ||
:* '''Auth Username''': You will need to indicate your Sub Account Username. ''(######_Username)'' | :* '''Auth Username''': You will need to indicate your Sub Account Username. ''(######_Username)'' | ||
| - | :* '''Password''': The password | + | :* '''Password''': The password for your Sub Account. |
| Line 66: | Line 66: | ||
:* '''Encrypt Media''': Set the option to '''No''' | :* '''Encrypt Media''': Set the option to '''No''' | ||
:* Propagate Refer: '''[Yes]''' '''NOTE:''' ''Select 'Yes' to propagate received SIP REFER messages from Microsoft upstream to this service. | :* Propagate Refer: '''[Yes]''' '''NOTE:''' ''Select 'Yes' to propagate received SIP REFER messages from Microsoft upstream to this service. | ||
| - | :: If set to 'No' then transfers are bridged out as new calls.'' On the 2nd Gen OneClick Teams connector you should select 'Yes' if you have users in a Call Center, but otherwise select 'No' as this will allow consultative transfers to work better.'' | + | :: If set to 'No' then transfers are bridged out as new calls.'' On the 2nd Gen OneClick Teams connector, you should select 'Yes' if you have users in a Call Center, but otherwise select 'No' as this will allow consultative transfers to work better.'' |
:* '''Propagate Refer''': Select '''[No]''' | :* '''Propagate Refer''': Select '''[No]''' | ||
:* '''Outside Line Prefix''': ''- You must leave this option blank -'' | :* '''Outside Line Prefix''': ''- You must leave this option blank -'' | ||
| Line 74: | Line 74: | ||
:* '''From Header''': You must select '''[SIP Identifier]''' | :* '''From Header''': You must select '''[SIP Identifier]''' | ||
:* '''P-Asserted-Identity Header''': ''This will be the outbound caller ID Name that will appear to the caller when you call to a Canadian number. | :* '''P-Asserted-Identity Header''': ''This will be the outbound caller ID Name that will appear to the caller when you call to a Canadian number. | ||
| - | ::: '''Note:''' For any outbound calls to an American number, most of these providers will use the data contained in the CNAM/ | + | ::: '''Note:''' For any outbound calls to an American number, most of these providers will use the data contained in the CNAM/LIDB Database associated with your outbound caller ID number (DID) to displaying your caller ID Name to your caller.'' |
| - | ::: ''You can request an update of the CNAM/ | + | ::: ''You can request an update of the CNAM/LIDB Database by submitting a request on the Live Chat service, or through a ticket.'' |
| - | ::: '''We suggest choosing one of these only, ''' '' | + | ::: '''We suggest choosing one of these only, ''' ''Generally it will be '''[Passthrough Caller Id]''''' |
:::* '''[Passthrough Caller Id]''' ''This will be the caller ID given by the far end (e.g. Teams (The user extension name))'', | :::* '''[Passthrough Caller Id]''' ''This will be the caller ID given by the far end (e.g. Teams (The user extension name))'', | ||
:::* '''[Trunk User Number]''': ''To display the phone number assigned to the user in the portal'' | :::* '''[Trunk User Number]''': ''To display the phone number assigned to the user in the portal'' | ||
Revision as of 20:27, 5 September 2020
Call2Teams™ is a simple add-on to Office 365 that connects Microsoft Teams to any PBX or SIP Trunk in minutes allowing making and receiving calls on any device using the Microsoft Teams App.
Contents |
Call2Teams Trunk
Pre-requisites
- You need to make a temporary spare user licence on Office 365
- Your VoIP.ms sub account credentials and your DIDs number. (If you don't have a sub account, you can create one under your VoIP.ms Customer Portal under "Sub Accounts" then, "Create Sub Account" or use your existing sub account.)
- Global Admin access to your Office 365 tenant
Set up the office 365 tenant
When you do your initial subscription to Call2Team you will receive an email with an invite you to login into the portal.

You will need to use your office 365 login. (Be sure that the email address comes from your organisation that you need to setup your Microsoft Teams with Call2Teams, and has the global level access).


You will need to give call2teams the necessary permissions to operate it. You must check the box "Connect on behalf of your organisation", then click on the button [Accept]

Configure your Call2Teams users
After giving the permissions by using a global admin email account, you will be redirected automatically to the Call2Teams Admin Portal. Now you need to create a new Trunk. To do so, click on the "Service" tab, on the upper navigation bar.

In this step, be sure you have the credentials of your VoIP.ms Sub Account. (If you don't have a sub account yet, you must create one by accessing your VoIP.ms portal.)
Click on Trunk tab in your Call2Teams Admin Portal, and "Add a new trunk".
With the drop-down, you will need to choose "[Custom]" then accept the warning by clicking on "[Proceed with Unsupported Configuration]"

Now, you will need to specify your VoIP.ms sub account credentials and validate some information.
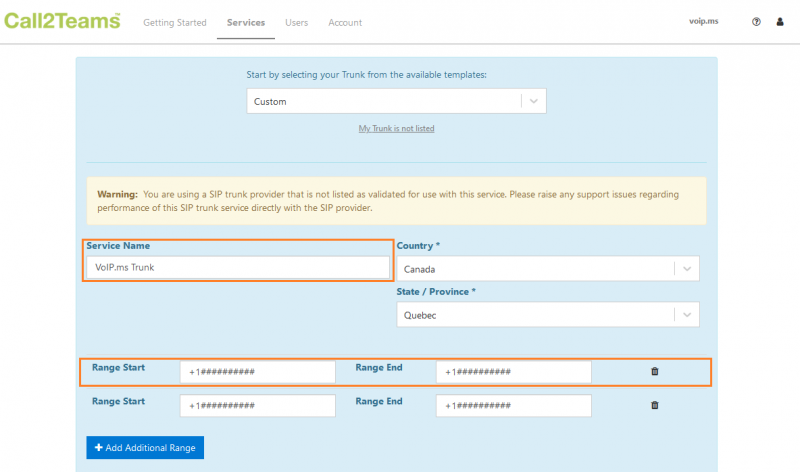
- Service Name: VoIP.ms Trunk 1 (Per instance, it may be different)
- Country: Your Country
- State/Province: Your State

- Range Start/Range End: This will be your VoIP.ms DID(s), However you will need to add the plus sign (+) followed by the (country code) of the DID, then your DID.
- If you have more than one DID that you would like to add, and they are not sequential, you will simply need to add the DID on the field START Range and the Range END.
- You will need to add each DID separately, by adding a new range, by clicking on [+ Add Additional Range]

- SIP Domain: You will need to indicate the PoP Server that you would like to use with your Trunk. Be sure that your DIDs are on the same PoP Server, in order to receive incoming calls.
- SIP Proxy: - You must leave this option blank -
- Authenticate Type: Select Registration
- Username: You will need to indicate your Sub Account Username. (######_Username)
- Auth Username: You will need to indicate your Sub Account Username. (######_Username)
- Password: The password for your Sub Account.


- Expiry (seconds): You may click on the Padlock, and enter the value [300], or you may also leave this option by default.
- Protocol: We suggest using UDP but you can use TCP.
- Encrypt Media: Set the option to No
- Propagate Refer: [Yes] NOTE: Select 'Yes' to propagate received SIP REFER messages from Microsoft upstream to this service.
- If set to 'No' then transfers are bridged out as new calls. On the 2nd Gen OneClick Teams connector, you should select 'Yes' if you have users in a Call Center, but otherwise select 'No' as this will allow consultative transfers to work better.
- Propagate Refer: Select [No]
- Outside Line Prefix: - You must leave this option blank -
- E164 Number Format: Select [Localized]

- From Header: You must select [SIP Identifier]
- P-Asserted-Identity Header: This will be the outbound caller ID Name that will appear to the caller when you call to a Canadian number.
- Note: For any outbound calls to an American number, most of these providers will use the data contained in the CNAM/LIDB Database associated with your outbound caller ID number (DID) to displaying your caller ID Name to your caller.
- You can request an update of the CNAM/LIDB Database by submitting a request on the Live Chat service, or through a ticket.
- We suggest choosing one of these only, Generally it will be [Passthrough Caller Id]
- [Passthrough Caller Id] This will be the caller ID given by the far end (e.g. Teams (The user extension name)),
- [Trunk User Number]: To display the phone number assigned to the user in the portal
- E164 Number Translation (The incoming number needs to be converted to E164 format)
- Outbound International Prefix: Indicate 011
- Outbound National Prefix: - You can leave as blank -
- Inbound International Prefix: Indicate
- Inbound National Prefix: - You can leave as blank -
- E164 Number Translation (The incoming number needs to be converted to E164 format)
Once the configuration is complete, you will need to press the [Add] button.
To validate if your Trunk that you've created is successfully registered in your VoIP.ms sub-account, you will see a Green light appear in the left corner of your Trunk entry. When you put your mouse on the green light, you will then see the next recording.

Associate a Number to Your Microsoft Teams Members
When your trunk is created, you will need to associate a number (DID) to your Microsoft Teams members. To do so, Go to the Users tab, from the upper navigation bar.
Click on the button, Add User, You will need to choose one of your Microsoft Teams members that you would like to associate a number. Then, select your trunk and the wished number you want to assign.

After adding your numbers to your members, you will need to click on the upper right button [Sync Now].