VoIP.ms Softphone
From VoIP.ms Wiki
| [quality revision] | [quality revision] |
(→Step 1 - Downloading VoIP.ms Softphone) |
|||
| (12 intermediate revisions not shown) | |||
| Line 21: | Line 21: | ||
: Download the softphone at the following URL: | : Download the softphone at the following URL: | ||
:* Android - [https://play.google.com/store/apps/details?id=ms.voip.softphone.android&pli=1 here] | :* Android - [https://play.google.com/store/apps/details?id=ms.voip.softphone.android&pli=1 here] | ||
| - | :* Apple - [https://apps.apple.com | + | :* Apple - [https://apps.apple.com/app/voip-ms-softphone/id6748383110 here] |
=Step 2 - Initial Configuration of VoIP.ms Softphone= | =Step 2 - Initial Configuration of VoIP.ms Softphone= | ||
| Line 28: | Line 28: | ||
| - | ::[[File: | + | ::[[File:VoIPmsSoftphone12025.png|border|150px]] |
| Line 35: | Line 35: | ||
:* Domain: Choose the server closest to your location. For a full list of available servers, please refer to [https://wiki.voip.ms/article/Servers this article]. | :* Domain: Choose the server closest to your location. For a full list of available servers, please refer to [https://wiki.voip.ms/article/Servers this article]. | ||
| - | + | <br> | |
| + | <div style="margin-left:10px; | ||
| + | padding:5px; | ||
| + | border-left: 6px solid rgb(208, 56, 45, 0.8); | ||
| + | box-shadow: 8px 6px 9px -2px #f2f2f2; | ||
| + | background-color: rgba(208, 56, 45, 0.08); | ||
| + | width:70vw;"> | ||
| + | 🚨 '''IMPORTANT''' | ||
| + | : <b style="color:#b30000;">Are you located outside of the Americas?</b> If so, please use any of the international servers [https://wiki.voip.ms/article/Choosing_Server Servers list] | ||
| + | : US/CAN servers might not be reachable from some countries outside the Americas, international servers can be reached from anywhere in the world. | ||
| + | </div> | ||
| + | |||
| + | <br> | ||
| + | : Once you’ve entered the required information, tap the check mark icon in the top-right corner of your screen to proceed. | ||
| - | ::[[File: | + | <br> |
| + | ::[[File:VoIPmsSoftphone22025.png|border|150px]] | ||
=Step 3 - Permission Allowance= | =Step 3 - Permission Allowance= | ||
| Line 44: | Line 58: | ||
: Next, you will be prompted to allow several permissions to ensure the VoIP.ms softphone works as intended: | : Next, you will be prompted to allow several permissions to ensure the VoIP.ms softphone works as intended: | ||
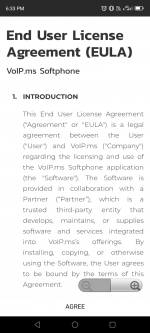
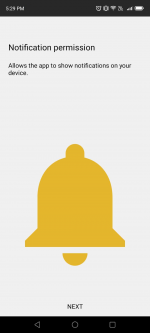
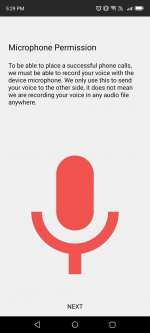
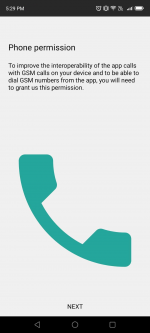
| - | :: 1) [[File: | + | :: 1) [[File:VoIPmsSoftphonetos2025.png|border|150px]] 2) [[File:VoIPmsSoftphone3.png|border|150px]] 3) [[File:VoIPmsSoftphone4.png|border|150px]] 4) [[File:VoIPmsSoftphone5.png|border|150px]] 5) [[File:VoIPmsSoftphone6.png|border|150px]] 6) [[File:VoIPmsSoftphone7.png|border|150px]] |
| + | ::* ''' End User License Agreement (EULA)''': All the information related to VoIP.ms EULA | ||
::* '''Notifications Permission''': Allows the app to notify you of missed calls, voicemail messages, and other important alerts. | ::* '''Notifications Permission''': Allows the app to notify you of missed calls, voicemail messages, and other important alerts. | ||
::* '''Microphone Permission''': Enables the app to transmit your voice clearly during calls. | ::* '''Microphone Permission''': Enables the app to transmit your voice clearly during calls. | ||
| Line 51: | Line 66: | ||
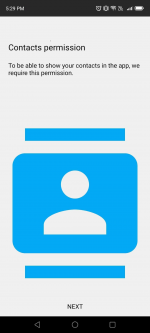
::* '''Contacts Permission''': Integrates your phone’s contact list, making it easier to place calls directly through the app. | ::* '''Contacts Permission''': Integrates your phone’s contact list, making it easier to place calls directly through the app. | ||
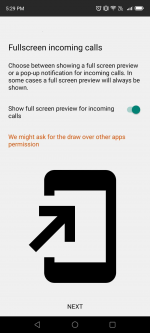
::* '''Full-Screen on Incoming Calls''': Ensures that incoming calls are displayed in full-screen mode rather than as a small popup. | ::* '''Full-Screen on Incoming Calls''': Ensures that incoming calls are displayed in full-screen mode rather than as a small popup. | ||
| - | |||
=Step 4 - Ready to Make Phone Calls!= | =Step 4 - Ready to Make Phone Calls!= | ||
| Line 61: | Line 75: | ||
=Step 5 - Setting Other Features= | =Step 5 - Setting Other Features= | ||
| + | |||
| + | ==Multi-Account Registration== | ||
| + | As of 2025-09-04, you can now register multiple accounts on your VoIP.ms softphone! | ||
| + | |||
| + | You can quickly create new registration under Settings (3 dots on top right of your softphone), Accounts and pressing the '''+'''. | ||
| + | |||
| + | As for quickly changing from 1 account to another to make outgoing calls, you can do so on the dialer page by pressing the account status on top left, and then changing to the sub account you want to use for dialing out. Incoming calls will work by default and will be pushed to your phone, even if the sub account is not selected. | ||
| + | |||
| + | |||
| + | [[File:Voipmssoftphonereg2.png|200px]] | ||
| + | |||
==Setting a Voicemail== | ==Setting a Voicemail== | ||
| Line 95: | Line 120: | ||
Once you've enabled encryption on your account: | Once you've enabled encryption on your account: | ||
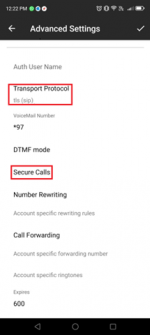
*open VoIP.ms softphone and click on the 3 dots on the top right of the application, Settings, Account Setup and then Advanced Settings. | *open VoIP.ms softphone and click on the 3 dots on the top right of the application, Settings, Account Setup and then Advanced Settings. | ||
| - | *Look for '''Transport Protocol''' option and change it to TLS ( | + | *Look for '''Transport Protocol''' option and change it to TLS (SIP). |
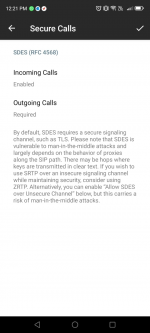
*Next, look for the option '''Secure Calls''', make sure that the option '''Incoming Calls''' is enabled and that the option '''Outgoing Calls''' is set to '''Required''', and then press on the check button on the top right of your screen. | *Next, look for the option '''Secure Calls''', make sure that the option '''Incoming Calls''' is enabled and that the option '''Outgoing Calls''' is set to '''Required''', and then press on the check button on the top right of your screen. | ||
| - | :: 1) [[File: | + | :: 1) [[File:VoIPmsSoftTLS20250916.png|border|150px]] 2) [[File:VoIPmsSoftTLS2.png|border|150px]] |
=FAQ= | =FAQ= | ||
| Line 105: | Line 130: | ||
'''Multiple Registration''' | '''Multiple Registration''' | ||
*Q - Can I have multiple sub accounts registered on VoIP.ms softphone? | *Q - Can I have multiple sub accounts registered on VoIP.ms softphone? | ||
| - | *A - | + | *A - As of 2025-09-04, you can now register multiple sub accounts. |
'''Push Notification''' | '''Push Notification''' | ||
| Line 117: | Line 142: | ||
**For the main account, head to Main Menu, Account Settings, Security tab and then change your SIP/IAX password. | **For the main account, head to Main Menu, Account Settings, Security tab and then change your SIP/IAX password. | ||
**For a sub account, head to Sub Account, Manage Sub Account, edit the sub account and then change your SIP/IAX password. | **For a sub account, head to Sub Account, Manage Sub Account, edit the sub account and then change your SIP/IAX password. | ||
| + | |||
| + | |||
| + | <div style="display:none"> | ||
| + | voip.ms softphone | ||
| + | voip.ms app | ||
| + | voip ms app | ||
| + | voip ms softphone | ||
| + | voip.ms softphone app | ||
| + | voip.ms softphone setup | ||
| + | </div> | ||
Latest revision as of 00:06, 10 March 2026
-

- After downloading the softphone to your mobile device, open the app to begin. Once the initial verification and setup are complete, you’ll be prompted to enter your username, password, and domain on the login screen.
- Username: This can be found by logging into your VoIP.ms customer portal and look for the SIP/IAX SIP username (6-digit number or the 6 digit followed by _sub-account-name).
- Password: If you haven’t changed it, this is the same password you use to access your VoIP.ms portal.
- Domain: Choose the server closest to your location. For a full list of available servers, please refer to this article.
- Are you located outside of the Americas? If so, please use any of the international servers Servers list
- US/CAN servers might not be reachable from some countries outside the Americas, international servers can be reached from anywhere in the world.
- Once you’ve entered the required information, tap the check mark icon in the top-right corner of your screen to proceed.
- Next, you will be prompted to allow several permissions to ensure the VoIP.ms softphone works as intended:
- 1)
 2)
2)  3)
3)  4)
4)  5)
5)  6)
6) 
- 1)
- End User License Agreement (EULA): All the information related to VoIP.ms EULA
- Notifications Permission: Allows the app to notify you of missed calls, voicemail messages, and other important alerts.
- Microphone Permission: Enables the app to transmit your voice clearly during calls.
- Phone Permission: Enhances interoperability between the app and your mobile device’s native calling features.
- Contacts Permission: Integrates your phone’s contact list, making it easier to place calls directly through the app.
- Full-Screen on Incoming Calls: Ensures that incoming calls are displayed in full-screen mode rather than as a small popup.
- Once you’ve granted all the necessary permissions, you’re ready to start making calls!
- To test your setup, you can dial 4443, which will initiate a call quality test. After the message plays, you’ll have the opportunity to speak and hear your voice played back.
- - Enable the option
- - In Forward To, set the number you want to forward calls to.
- open VoIP.ms softphone and click on the 3 dots on the top right of the application, Settings, Account Setup and then Advanced Settings.
- Look for Transport Protocol option and change it to TLS (SIP).
- Next, look for the option Secure Calls, make sure that the option Incoming Calls is enabled and that the option Outgoing Calls is set to Required, and then press on the check button on the top right of your screen.
- 1)
 2)
2) 
- 1)
- Q - Can I have multiple sub accounts registered on VoIP.ms softphone?
- A - As of 2025-09-04, you can now register multiple sub accounts.
- Q - Does the softphone offer PUSH notification?
- A - Yes.
- Q - My main account / sub account still shows registered despite removing the VoIP.ms softphone
- A - Your credentials are in the PUSH server. To resolve this:
- Head into your VoIP.ms portal.
- For the main account, head to Main Menu, Account Settings, Security tab and then change your SIP/IAX password.
- For a sub account, head to Sub Account, Manage Sub Account, edit the sub account and then change your SIP/IAX password.
Simplify the way you communicate, whether you’re in the office or on the go. VoIP.ms Softphone provides you the flexibility you need.
Available on both the App Store(2) and Google Play.
(1) The VoIP.ms Softphone is in BETA and will be available free of charge starting on May 2025, until further notice.
Contents |
You will find below all the steps to succesfully start using VoIP.ms Softphone.
Step 1 - Downloading VoIP.ms Softphone
Step 2 - Initial Configuration of VoIP.ms Softphone

🚨 IMPORTANT

Step 3 - Permission Allowance


Step 4 - Ready to Make Phone Calls!

Step 5 - Setting Other Features
Multi-Account Registration
As of 2025-09-04, you can now register multiple accounts on your VoIP.ms softphone!
You can quickly create new registration under Settings (3 dots on top right of your softphone), Accounts and pressing the +.
As for quickly changing from 1 account to another to make outgoing calls, you can do so on the dialer page by pressing the account status on top left, and then changing to the sub account you want to use for dialing out. Incoming calls will work by default and will be pushed to your phone, even if the sub account is not selected.

Setting a Voicemail
In the softphone, press the menu button on the top right (3 dots), Settings, Account Setup, Advanced Settings and set the option VoiceMail Number to *97. Once this is done, you will need to configure your voicemail in your VoIP.ms portal. See Following Article to proceed on the configuration at the portal level.
Setting SMS Messages
See Following Article to set SMS messages.
VoIP.ms Softphone Call Recording Feature
To record calls directly from your VoIP.ms softphone, simply place a call and then press on the record button.

VoIP.ms Softphone Call Forwarding Feature
To forward calls automatically on incoming calls, press the 3 dots button on the top right of your screen, settings, Preferences, Call Forwarding and:
You can enable instead the option 'Forward Button, allowing you to forward calls to an arbitrary number when accepting a call.
Setting SIP TLS (Encrypted Calls)
Note: You must have already downloaded and configured your softphone. If not done already, please go back to the initial steps on configuring your softphone.
You will first need to enable the encryption setting at your VoIP.ms account level. Please refer to this article on knowing how to configure SIP TLS on your VoIP.ms main account or sub account.
Once you've enabled encryption on your account:


FAQ
Multiple Registration
Push Notification
Registration Persisting Despite the VoIP.ms Application Being Removed