VoIP.ms Teams Connector
From VoIP.ms Wiki
(Difference between revisions)
| [checked revision] | [checked revision] |
| Line 1: | Line 1: | ||
= What is VoIP.ms Teams Connector? = | = What is VoIP.ms Teams Connector? = | ||
| - | : The VoIP.ms Teams connector lets you link your VoIP.ms account to Microsoft Teams, so you can make and receive calls via your Microsoft Teams application, whether it’s on mobile, tablet or desktop, while still taking advantage of VoIP.ms hosted features. This connector is powered by TeamMate Technology, a third-party solution enabling seamless integration with Teams. Practically speaking, your Microsoft Teams becomes your softphone, giving you the option of using the built-in dial pad to make or receive calls. You may also link your VoIP.ms account to Microsoft Teams to | + | : The VoIP.ms Teams connector lets you link your VoIP.ms account to Microsoft Teams, so you can make and receive calls via your Microsoft Teams application, whether it’s on mobile, tablet or desktop, while still taking advantage of VoIP.ms hosted features. This connector is powered by TeamMate Technology, a third-party solution enabling seamless integration with Teams. Practically speaking, your Microsoft Teams becomes your softphone, giving you the option of using the built-in dial pad to make or receive calls. You may also link your VoIP.ms account to Microsoft Teams to [[VoIP.ms_Teams_Connector#SMS_Connector_To_be_released_by_Q2_2024 | send and receive text messages directly within Teams]]. '''Please note that you will need a Microsoft E1 license at the very minimum to be able to leverage this connector.''' For more information on Microsoft licenses, [[VoIP.ms_Teams_Connector_Licensing | please check here]]. |
= Step-by-step Configuration = | = Step-by-step Configuration = | ||
| Line 9: | Line 9: | ||
: <h3> 1. Prepare the VoIP.ms environment </h3> | : <h3> 1. Prepare the VoIP.ms environment </h3> | ||
| - | :: '''1.1''' | + | :: '''1.1''' Once in [https://voip.ms/signin/index.php?ln=en VoIP.ms Portal], create [[Sub_Accounts#How_to_Create_a_Sub_Account | sub accounts]] for each user that will use the Teams integration by heading over to Sub Accounts and then Create Sub Account. |
:: '''1.2''' Once done, change the Dialing Mode to E.164 by heading to Main Menu, Account Settings, General tab and set the option ‘’’Dialing Mode’’’ to E164, and then apply the change. | :: '''1.2''' Once done, change the Dialing Mode to E.164 by heading to Main Menu, Account Settings, General tab and set the option ‘’’Dialing Mode’’’ to E164, and then apply the change. | ||
| Line 15: | Line 15: | ||
: <h3> 2. Assign Microsoft licenses to each user </h3> | : <h3> 2. Assign Microsoft licenses to each user </h3> | ||
| - | :: | + | :: You will need to assign the proper [[VoIP.ms_Teams_Connector_Licensing | Microsoft licenses]] to the users that will be using this integration. Please note that sometimes due to high traffic '''Microsoft can take up to 24 hours to activate licenses after they have been assigned''', so doing this ahead of time will make the rest of the process much smoother. |
| - | ::'''2.1''' Once | + | ::'''2.1''' Once in your [https://admin.microsoft365.com/Adminportal/Home?#/licenses Microsoft Admin Center], select Microsoft Teams Phone Standard. |
| Line 43: | Line 43: | ||
:<h3> 3. Get your unique activation link from VoIP.ms </h3> | :<h3> 3. Get your unique activation link from VoIP.ms </h3> | ||
| - | :: To get your unique activation link, simply send | + | :: To get your unique activation link, simply send an email to [mailto:[email protected] [email protected]] and provide our team with the following information: |
| - | :::* The number of licenses | + | :::* The number of licenses you will need (ie. how many users), and |
:::* The e-mail address of the user who has the "Microsoft Global Administrator" role. | :::* The e-mail address of the user who has the "Microsoft Global Administrator" role. | ||
| Line 56: | Line 56: | ||
| - | :: '''4.2''' You will then need to log into the [https://enterprise.connecttoteams.com/ | + | :: '''4.2''' You will then need to log into the [https://enterprise.connecttoteams.com/ ConnectToTeams Portal] with your Global Administrator credentials, and authorize the requested permissions. |
| Line 85: | Line 85: | ||
: <h3> 5. Configure Direct Routing</h3> | : <h3> 5. Configure Direct Routing</h3> | ||
| - | :: '''5.1''' Upon logging in as the Global Administrator into the [https://enterprise.connecttoteams.com/ | + | :: '''5.1''' Upon logging in as the Global Administrator into the [https://enterprise.connecttoteams.com/ ConnectToTeams Portal], use the sidebar menu to navigate to Direct Routing. |
:: '''5.2''' Confirm there is at least one available Microsoft license free to be assigned. | :: '''5.2''' Confirm there is at least one available Microsoft license free to be assigned. | ||
Revision as of 02:13, 17 May 2024
Contents |
What is VoIP.ms Teams Connector?
- The VoIP.ms Teams connector lets you link your VoIP.ms account to Microsoft Teams, so you can make and receive calls via your Microsoft Teams application, whether it’s on mobile, tablet or desktop, while still taking advantage of VoIP.ms hosted features. This connector is powered by TeamMate Technology, a third-party solution enabling seamless integration with Teams. Practically speaking, your Microsoft Teams becomes your softphone, giving you the option of using the built-in dial pad to make or receive calls. You may also link your VoIP.ms account to Microsoft Teams to send and receive text messages directly within Teams. Please note that you will need a Microsoft E1 license at the very minimum to be able to leverage this connector. For more information on Microsoft licenses, please check here.
Step-by-step Configuration
- Please follow the instructions below to get started. Note that this process requires the involvement of the Microsoft Global Administrator. Some tasks can be delegated from the global admin to the Microsoft Teams Service Admin or Skype Admin, but due to Microsoft's security policies there is no way to complete setup without the Global Administrator initial involvement.
-
1. Prepare the VoIP.ms environment
- 1.1 Once in VoIP.ms Portal, create sub accounts for each user that will use the Teams integration by heading over to Sub Accounts and then Create Sub Account.
- 1.2 Once done, change the Dialing Mode to E.164 by heading to Main Menu, Account Settings, General tab and set the option ‘’’Dialing Mode’’’ to E164, and then apply the change.
-
2. Assign Microsoft licenses to each user
- You will need to assign the proper Microsoft licenses to the users that will be using this integration. Please note that sometimes due to high traffic Microsoft can take up to 24 hours to activate licenses after they have been assigned, so doing this ahead of time will make the rest of the process much smoother.
- 2.1 Once in your Microsoft Admin Center, select Microsoft Teams Phone Standard.

- 2.2 Then press on the button Assign Licenses which will prompt with a new side window to find the user(s) you wish to add. You can search the users with their name or email address. Once you have selected the users to have the license, proceed on assigning the licenses by pressing Assign.

🚨 Teams Trial License
- If there is a canceled/suspended trial license and a valid license is then added with the same name - please make sure that the trial license is first removed from the license listing.
3. Get your unique activation link from VoIP.ms
- To get your unique activation link, simply send an email to [email protected] and provide our team with the following information:
- The number of licenses you will need (ie. how many users), and
- The e-mail address of the user who has the "Microsoft Global Administrator" role.
- To get your unique activation link, simply send an email to [email protected] and provide our team with the following information:
-
4. Grant permissions
- 4.1 Once our team processed your request, the global administrator will receive an email and will need to click the “Complete” button at the bottom of the e-mail.

- 4.2 You will then need to log into the ConnectToTeams Portal with your Global Administrator credentials, and authorize the requested permissions.
- 4.3 There will be two permission screens that are mandatory and will need to be granted before the enterprise can log into the connector.
- 1)
 2)
2)  3)
3)  4) 5)
4) 5) 
- 1)


- 4.4 Once logged in, there will be prompts to sync a group of users and then on the dashboard to grant optional additional permissions that enhances call troubleshooting and presence syncing.
- 1)
 2)
2) 
- 1)


- 4.5 You must click on the "Grant consent" button of each setting.
- 4.6 You will then be prompted to go over Microsoft's "Permissions requested" pop-up window for all the settings.

-
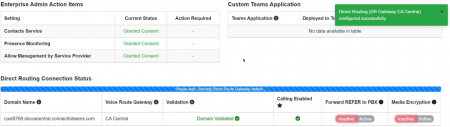
5. Configure Direct Routing
- 5.1 Upon logging in as the Global Administrator into the ConnectToTeams Portal, use the sidebar menu to navigate to Direct Routing.
- 5.2 Confirm there is at least one available Microsoft license free to be assigned.

- 5.3 Once confirmed, select the desired Gateway then Click “Complete Direct Routing”.

- 5.4 Ensure the verification process succeeds, and then click "Complete".

- 5.5 Wait until the notification on the dashboard lets you know that the setup is complete and the administrator receives a confirmation email.
- 1)
 2)
2) 
- 1)


- Note: If the process takes longer than an hour open a ticket with ConnecttoTeams so we can unfreeze the process, as this indicates Microsoft's servers were under heavy traffic and timed out. The global administrator will receive an email when it is complete.
- 5.6 Note that when everything looks completed, there may still be a slight delay. It is possible to click "FINISH"

- 5.7 If you mouseover Details, it will provide you the current status.

- 5.8. We strongly recommend enabling REFER. This will allow you to transfer calls and use VoIP.ms call park feature.

-
6. Configure PBX settings
- 6.1 Still in the Enterprise portal, navigate to the “PBX" section and add a new PBX connection with the "Add PBX" button.

- 6.2 Input the VoIP.ms parameters required for the PBX connector. Note that this task can be delegated to someone other than the Microsoft Global Administrator.
- The necessary PBX parameters includes:
- PBX SIP Domain: VoIP.ms POP Server Hostname - See full list of servers
- PBX SIP Domain Proxy: VoIP.ms POP Server Hostname - See full list of servers
- Voicemail Feature Code: *97
- PBX SIP Domain Proxy Port: 5060
- Codecs: G722 or G711u (Be sure the sub-account is set with the same codec)
- Reg Expires: 600
- Caller ID on Forwarding: User's CallerID Number
- Caller Name Policy: Other
- Custom Caller Name: CallerID Name. Please note that CallerID Name must be in CAPITAL LETTERS, and cannot exceed 15 characters including spaces.

🚨 Important
- The PBX SIP Domain and PBX SIP Domain Proxy must be the same server as the one used for your DID number(s).
-
7. Add Users
- This can be done individually or in bulk. You will need the information about each user's created as sub accounts before proceeding with this step.
- Note: This task takes some time to process, please wait for a confirmation email telling you it is completed. This task can also be delegated to someone other than the Microsoft Global Administrator, but the Global Admin will have to log in to sync the users once they are uploaded.
- 7.1 On Your [| Teams Connector admin page], go to Users on the left menu.

- 7.2 Click on Add User on the top right of the page.

- 7.3 Fill in all the following information for creating your user:
- User Tag: Used to find your user easily. Put the name you wish for reference purpose.
- SIP User: Your sub account userID. E.g: 111111_subaccount.
- Phone Number: The phone number that this user will be passing for his outgoing calls.
- Disable Voicemail in Teams: If you want to use Teams voicemail, keep it unchecked. If you want to use your VoIP.ms voicemail, checkbox it.
- Custom Caller Name: Only for Canada. Pass the callerID Name you wish to pass. For United States, refer to [| this article].
- SIP Authentication ID: Your sub account userID. E.g: 111111_subaccount.
- SIP Password: Your sub account password you entered while creating the sub account.
- Confirm SIP Password: Confirm your sub account password.

- 7.4 Once you have filed all the information, press Save User.
SMS Connector To be released by Q2 2024
- The proper instructions will be available when this feature becomes available.
Related Articles